Lender tip sheet for collaboration with settlement agents
A. Access a Loan in Simplifile
- Follow your company’s instructions to access and log in to Simplifile.
- If desired, enter text and numbers in the Search loans field at the top of the page to find the loan you want.
- Select the name of the loan you want to open.
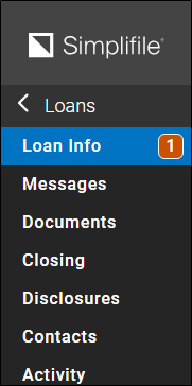
B. Simplifile Menu Links Available from the Loan Information page
|
ORANGE indicates items you need to review or complete. BLUE indicates items the agent needs to review or complete. A competed task’s orange indicator changes to blue pending agent approval. |
| Page | Description |
|---|---|
| < Loans | List of loans and loan search. The status of the displayed loans is highlighted on the left navigation menu. |
| Loan Info | Loan Information page with basic loan information. |
| Messages | Messages page where there are instant messages with the settlement agent. |
| Documents | Documents page where you can upload and download documents shared with and by settlement agents. |
| Closing | Closing Workflow page where you perform the closing workflow. |
| Disclosures | Disclosures page where you view loan estimate and closing disclosure fee collaboration page. |
| Contacts | Contacts page where you view contact information for key loan participants. |
| Activity | Activity page where you view loan audit trail. |
C. Assign Lenders
On the Loan Information page, use the + Add Assignment button to add multiple lender users to the loan. Use the Assign to me link to assign yourself to the loan as an additional lender user.
D. Loan Statuses
| Created | In Simplifile, the loan has been created but a settlement agent has not been assigned. |
| Pre‑Close | A closing agent has been assigned to the loan. The file is active. The lender and the agent are collaborating to close the loan. |
| Post‑Close | The lender has marked the loan as funded. Final recorded documents are pending. |
| Archived | The lender has marked the file as archived. |
E. Loan Filters
Choose a status from the left navigation menu to display only loans of that status. Then do any or all of the following:
- Enter characters in the Search Loans field to display loans that use those characters.
- Select the Mine view button to display only loans assigned to you. Select the All
 view button to display loans assigned to anyone at your organization.
- Select a settlement company to display only loans assigned to that company.
- Use the Title Filter dropdown list to display loans with various preliminary title package statuses.
F. Fee Collaboration Labels
In the left navigation menu, select the Disclosures item.
Certain fee additions, removals, and deletions pass back and forth between you and the settlement agent until they have been approved by both parties.
During the process, you will see the following labels:

|
Indicates an added fee. |

|
Indicates required information. This may be set up in a loan disclosures template. |

|
Indicates a changed fee that you can edit. |

|
Select to view an item’s values before a proposed change. |

|
Indicates a proposed removal. |

|
Select to accept an addition or change. |

|
Select to propose a removal. |

|
Select to reject a proposed removal. |

|
Select to view or attach an invoice to the fee. A blue icon blue indicates an invoice is already attached. |
 or or  |
Select to send a message to the agent. |

|
Select to set a Net Funds value for the fee. |
G. Fee Collaboration Notes
- You control the fee names and categories used in Simplifile.
- Simplifile automatically notifies you of any change if one of the following happens:
- The agent leaves the Disclosures page.
- Fifteen minutes have passed since the agent made a change.
- The agent logs out of Simplifile.
- Select the Find/Add Fee button on the Disclosures page to find and add valid fees to the appropriate section. Only approved fees are available.
- Use the text balloons to send information about a fee change to the agent.
H. View, Save, or Print a Loan
- On the main Loans page, select the name of the loan you want to work with to display the Loan Information page for that loan.
- In the upper right corner, select the Print button.
- In the Print options window, mark the boxes for the items you want to view, save, or print. To print the closing disclosure, mark Fee Disclosures and Closing Disclosure.
- Select the Print button.
- When the window opens, do one of the following:
- To view the document, open the document with an appropriate application such as Adobe Reader.
- To save the document, choose the Save option. Your computer operating system determines where the document is stored.
- To print the document, view or save the document. If you saved the document, open the document, if necessary. Then use the Simplifile application print tool to print the document.