Document Builder Configuration page
Overview
This topic provides information on how to use the Document Builder Configuration page.
Some recording jurisdictions require that an eRecorded document be digitally signed. This helps to verify that the document is exactly the same as its paper (hard‑copy) original.
If you have the right permission and if your organization has the eSign service activated, you can make several choices that determine actions document signers must take.
- Use preset signer assignments for template documents. Use this option if you plan to use signers that Simplifile sets up for you, or if you specify signers through your Simplifile API. This setting applies to template documents.
You can make some basic setup choices for each organization you are affiliated with that has a Document Builder license. You can do the following:
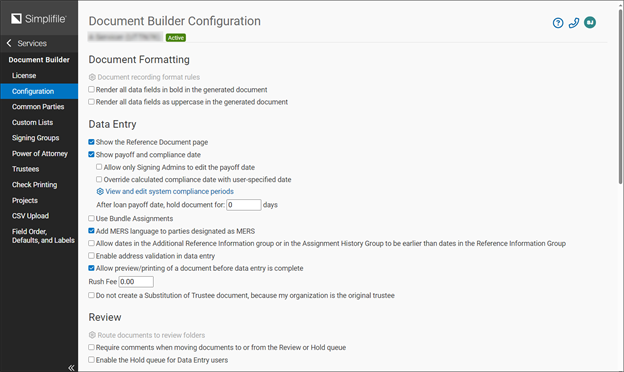
- Require that comments be added to any document that is moved to or from a review folder.
- If you have set up multiple folders, choose the folder where you want to add new documents.
- Hold a loan document for a number of days you specify after the loan payoff date.
- Choose to show the compliance date on the Package List page and signing pages. Marking this box requires the loan payoff date on the data entry page. The loan payoff date is used to calculate the compliance date.
- Store one or more stamps or corporate seals in Simplifile. You have Simplifile apply a stored item to a specified location on each recordable document during data entry.
- Configure other required stamp activities. For example, you can choose to automatically apply stamps to North Carolina submissions.
- Require digital certificates for signers or notaries, or both. This setting requires signers to set up signed digital certificates and passwords in addition to their click‑sign signatures.
I want to ...
Open the Document Builder Configuration page
- In the navigation menu, select the Organizations item. The Organizations page opens in the right panel.
- On the Organizations page, select the name of the organization. The Organization Contact Information page opens in the right panel and the navigation menu changes with Contracts selected.
- In the navigation menu, select the Document Builder item. The Document Builder License page opens in the right panel and the navigation menu changes.
- In the navigation menu under the Document Builder item, select the Configuration item. The Document Builder Configuration page opens in the right panel.
Require comments when moving documents to and from review folders
This option requires reviewers at your organization to add a comment before they can move a document into or out of a review folder. For more information, see Use the Packages page to eSign a document.
- Open the Document Builder Configuration page.
- In the Document Workflow section, do any or all of the following:
- To require comments on a document before it can be moved to or from a review folder, mark the Require comments when moving documents to and from review folders box.
- To hold a Satisfaction of Deed of Trust, Mortgage, or Reconveyance after the loan is paid off, enter the number of days the documents should be retained in the After loan payoff date, hold document for X days field.
- To require the loan payoff date during data entry, mark Show payoff and compliance date. The system uses the loan payoff date to calculate the compliance date, which can then display on the Package List page and the signing pages.
-
To prevent all users but Signing Admins to modify the Loan Payoff Date field, mark the Allow only Signing Admins to edit the payoff date option.
Require comments on a document before it can be moved to or from a review folder
- Open the Document Builder Configuration page.
- In the Document Workflow section, mark the Require comments when moving documents to and from review folders box.
- In the Signer and Notary section, do any or all of the following:
- To use default signer assignments for documents created from a template, mark the Use preset signer assignments for template documents box.
- To require non‑notary signers to use digital certificates, mark the Require digital certificate for signers box.
- To require notaries to use digital certificates, mark the Require digital certificate for notaries box.
Configure stamps
- Open the Document Builder Configuration page.
- In the Stamps section, do any or all of the following:
- If you apply corporate seals to documents, select the Add a new corporate seal item. Then find and open the electronic file of the seal on your computer.
- Mark the boxes of any state‑specific stamp tasks you want Simplifile to complete.
- To change the display name of the seal, select the edit icon after the current name. In the window, make any desired changes. Then select the Rename button.
- To add an additional seal, select the Add a new corporate seal button. Then find and open the electronic file of the seal on your computer.
- To replace the current seal with a different seal,
select the replace icon (
 ). Then find and open
the electronic file of the replacement seal on
your computer.
). Then find and open
the electronic file of the replacement seal on
your computer.
Configure signers and notaries
- Open the Document Builder Configuration page.
- In the Signer and Notary section, do any or all of the following:
To require non‑notary signers to use digital certificates, mark the Require digital certificate for signers box.
This option requires reviewers at your organization who must sign or witness a document that does not require a notary to use a digital certificate to verify their credentials. If the person who needs to sign a document has created a click‑sign signature within Simplifile, the system accesses that signature to digitally sign the document. If the person does not have a click‑sign signature saved within Simplifile, the system adds an Electronically Signed verification to the document.
To require notaries to use digital certificates, mark the Require digital certificate for notaries box.
- To define states the require a VP to sign document, use the dropdown field to open a list of states and mark each state that requires a VP to sign the documents.
For more information on digital signatures, see Notary and signature setup.
Set the Show payoff date and compliance date option
- Open the Document Builder Configuration page.
- In the Document Workflow section, do any or all of the following:
To require non‑notary signers to use digital certificates, mark the Require digital certificate for signers box.
This option requires reviewers at your organization who must sign or witness a document that does not require a notary to use a digital certificate to verify their credentials. If the person who needs to sign a document has created a click‑sign signature within Simplifile, the system accesses that signature to digitally sign the document. If the person does not have a click‑sign signature saved within Simplifile, the system adds an Electronically Signed verification to the document.
To require notaries to use digital certificates, mark the Require digital certificate for notaries box.
- To define states the require a VP to sign document, use the dropdown field to open a list of states and mark each state that requires a VP to sign the documents.