Tip sheet for the paper delivery workflow
Overview
Who should use this tip sheet? Simplifile users preparing packages requiring "ink‑sign" (or "wet sign") documents and paper delivery (mail) submission using Simplifile Document Builder.
There are several counties across the United States that do not accept eRecorded documents. To accommodate these counties, Simplifile Document Builder has a "Paper Workflow" which provides a process to prepare and print the documents in Simplifile, ink‑sign (or wet sign) the printed documents, and deliver (mail) the paper documents to the county.
Status definitions used in the Paper Delivery workflow
- Data Entry: The document is being prepared and has not yet been generated.
- Sign: The document has been generated and is awaiting the signature (printing in the ink‑sign or paper workflows)
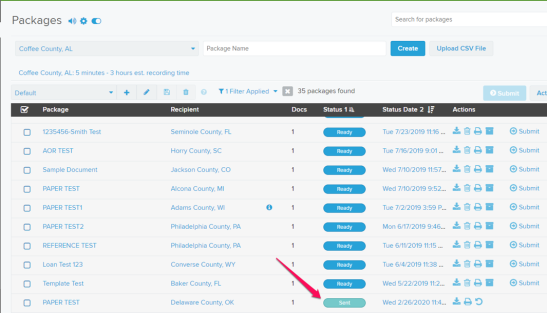
- Ready: The package is ready to print.
- Sent: A "submitted" paper package could be used as an indicator that the paper has been mailed to the county.
- Recorded: Recording information has been manually entered (and possibly an image has been uploaded).
Paper Delivery workflow
Step 1 ‑ Add a template document
- Create the package as usual with the State and County fields.
-
Enter the information as needed.
- When ready, go to the bottom of the Data Entry page and select the Generate Document
 button. The generated page is displayed in the right panel.
For counties that do not accept eRecording, the Submission Format field displays an uneditable Paper value.
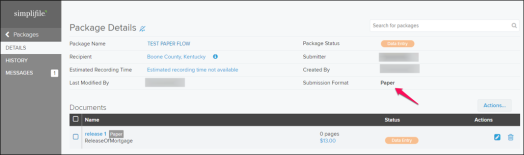
You can change the Submission Format field to the Paper value on any package if the Paper link value is displayed. You may do this if you want to mail something, don't know who will sign the document, or if the document will be signed outside the organization.

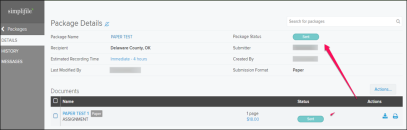
The Package Details page Package Status field displays Sign and Submission Format field displays Paper.
Step 2 ‑ Print the documents to be ink‑signed
-
From the navigation menu, select the Signing > Print item. The Print Documents page opens in the right panel.
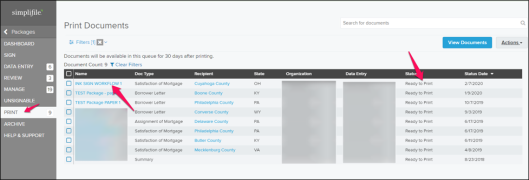
- Print the document or documents.
To print an individual document
In the Name column, select the document name you want to print.
The document opens and displays icons to download or print the document.
- Select the Print icon. The package is in now in Ready status.
To print multiple documents
- Mark the checkbox of each document you want to print. To mark all the documents, select the checkbox in the header row.
- Select the Actions
 dropdown button. A menu opens.
 - Select the Print Documents option.
- When a county does not accept eRecorded documents, the documents are printed without a scanner icon (
 ) in the lower‑right corner of each page. The lack of the scanner icon means that the paper document must be delivered (usually mailed) to the county and is not eligible for eRecording.
 - A billing transaction incurred.
- The document is now in the PRINTED status.
Step 3 ‑ (OPTIONAL) Edit documents that are in the Ready status or Printed status.
If you need to edit a document that is in the Ready status or Printed status, do the following:
- In the Packages page table, select the package name. The Package Details page opens in the right panel.
-
In the Package Details page Documents table on the row of the document you want to edit, select the Edit icon.
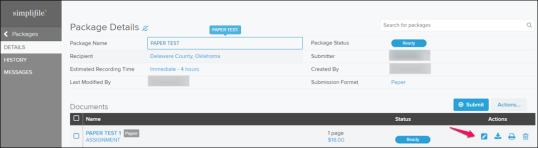
The document page opens so you can edit it.
- Make the wanted data entry changes.
- When ready, go to the bottom of the Data Entry page and select the Generate Document button. The generated page is displayed in the right panel and the document is updated and returned to the Print Queue.
- Print the document again as directed in Step 2 ‑ Print the documents to be ink‑signed
Step 4 ‑ Ink‑sign the printed documents
- Sign and notarize the documents.
Step 5 ‑ Deliver the ink‑signed, paper delivery documents to the county
After printing the document or documents and ink‑signing it or them as required, you may want to incorporate a policy to “submit” your paper documents as a way of tracking what has been mailed.
You can submit Paper documents from either the Package Details page or the Package page.
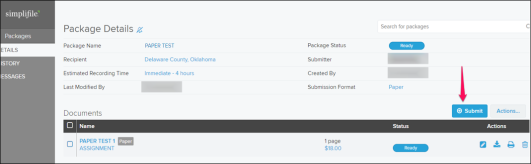
Submitting a package from the Package Details page
- In the Documents table, mark the document of documents to be submitted.
-
Select the Submit button.
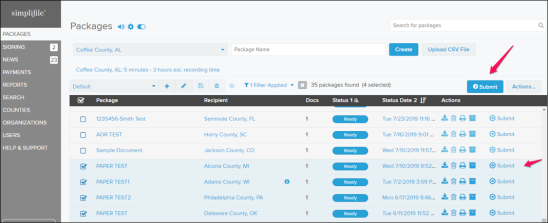
Submitting a package from the Packages page
- In the Packages table, mark the package or packages to be submitted.
-
Select the Submit button.
Rejected Package Handling
When a package is rejected by a county or if you need to edit a sent package, handle the rejection as follows.
- From the Packages page, search for the package you want to reject. The Package Details page opens.
- In the Package Details page, select the Actions dropdown button. A menu opens.
- Select the Reject Package item.

The Enter Rejection Reasons window opens.
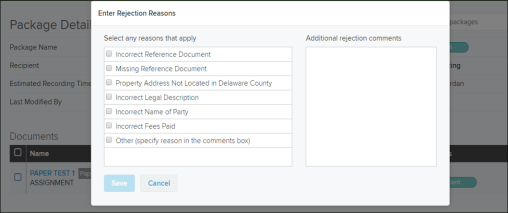
- In the Enter Rejection Reason window,
- Enter the rejection reason.
- Select the Save
 button. The window closes.
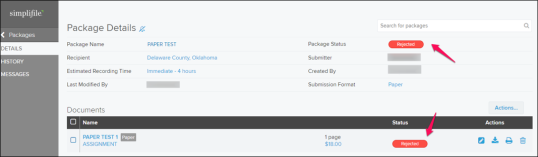
In the Package Detail page, the Package Status field displays the Rejected status.
-
Edit the rejected item and package as needed.
The Edit icon is now available and you can update the document as needed.
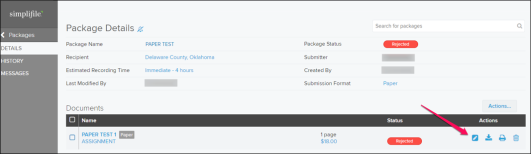
- When ready, go to the bottom of the Data Entry page and select the Generate Document button. The generated page is displayed in the right panel and the document is updated and returned to the Print Queue.
Recorded package handling
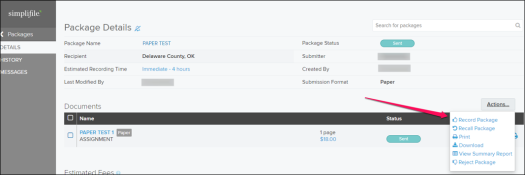
When the package is accepted and recorded by the county, do the following.
- From the Packages page, search for the package you want to reject. The Package Details page opens.
- In the Package Details page, select the Actions dropdown button. A menu opens.
- Select the Record Package item. The Recorded Document page opens.
- In the Recorded Document page:
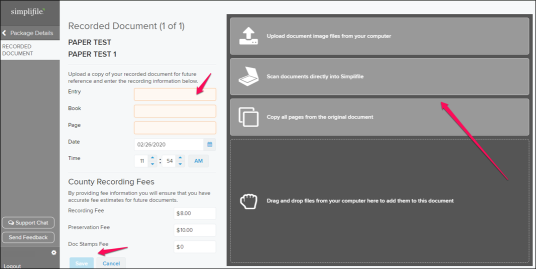
- Enter the recording information provided by the county.
- Upload the document.
- Select the Save button.
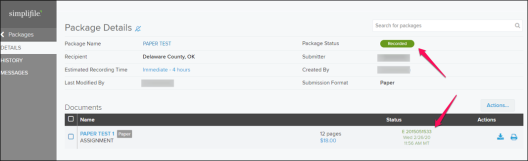
The Package Details page now displays the Recorded status with the recording information in the document line.
You can select the document name to view the scanned image and recording information.