Notary and signature setup
Overview
People receive email notification when you assign them the Signer or Notary permission. The email includes a link that takes the person to either the Click‑Sign Signature page or the Notary Credentials page, depending on which process the person needs to follow. A note displays on the page that requests that the person select to continue setting up their user account, and walks them through the process.
If the person does not use the link in the email, Simplifile displays the same note the next time he or she logs in. The note requests that the person select to continue setup, and walks them through the process.
Notaries who work at your company and register with Simplifile from within the software can review or edit the notary information Simplifile has stored for them. The Click‑Sign option in Simplifile helps manage signatures. Both options let people electronically validate documents.
Notary information
Anyone at your company who is a notary can register his or her notarial credentials with Simplifile. Notaries can view or edit their notary information at any time.
Depending on your settings, you may also have access to a Notary Journal page in Simplifile. This page tracks notarial acts you perform. Below is an example.
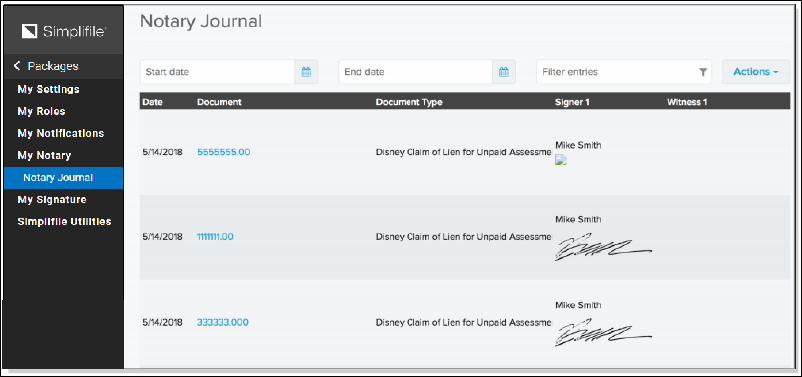
For more information on the Notary Journal, contact your Simplifile account manager.
How to add, view, and edit notary information within Simplifile
- In the My Simplifile Toolbar user icon select the Notary item.
- To add or edit your information, complete the fields that display. Then select Generate Notary Form and follow the directions that display.
- To view a currently stored form, go to the Current Credentials section and select View current form.
Click‑Sign Signatures
In addition to notaries, someone at your office may need to provide a digital signature that Simplifile can apply to a document or a special form for a document. In Simplifile, these digital signatures are called Click‑Sign Signatures. Simplifile lets notaries and other designated signers upload a file or scan a page containing their signature.
Using the Click‑Sign Signature form
Theeasiestwaytomakesureyoursignatureisthecorrectsizeistoprint,sign,andscantheClick‑Signsignatureform. YoufindthisformwithinSimplifile.
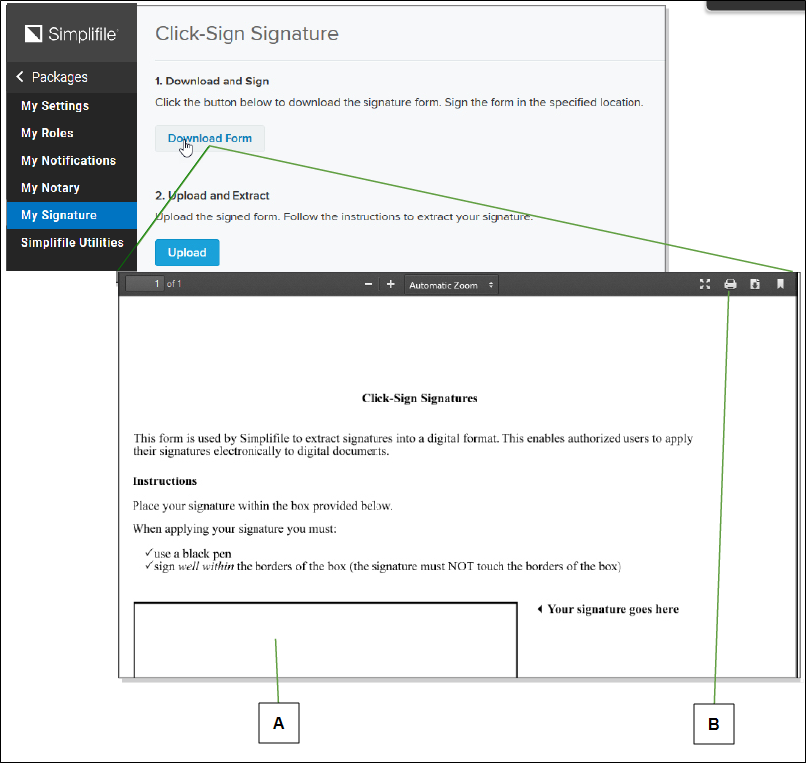
| Letter | Description |
|---|---|
| A | After you print the form, sign in this box. Use a scanner to create a file of the form. Your scanned file must have a resolution of 300 DPI and use a TWAIN driver. Return to this page and upload the form. |
| B | Select this printer icon to print the form. |
Follow these guidelines when you sign the form:
-
Sign inside the empty box.
No part of your signature can touch or extend beyond the borders of the box.
-
Use black ink and a medium or bold pen.
This helps assure that your signature is dark and clear enough for the computer to read easily.
Follow these guidelines when you scan and save a signature file:
- Use a resolution of 300 DPI.
- Scan in black and white, not color or grayscale.
- Scan as a document or text, not a photograph.
- Save the file as a .TIFF or a PDF.
- Use a TWAIN driver.
When you have a completed Click‑Sign Signature form saved on your computer, select Upload and follow the instructions to upload your file. Then continue with positioning the Signature box and baseline.
Positioning the Signature box and baseline
Afterasignaturefiledisplaysonthescreen,youmustpositionthesignatureboxaroundthesignature.Youalsoneedto putthebaselineunderthesignatureasifyouhadsignedontheline.Belowisanexample.
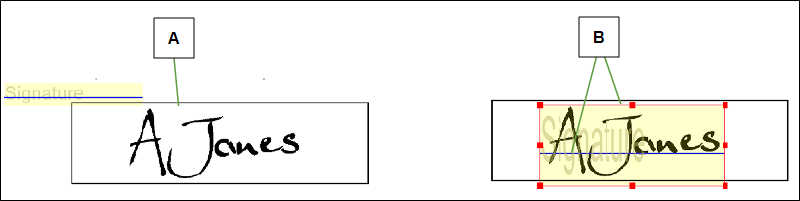
| Letter | Description |
|---|---|
| A | Your signature displays on the screen after you upload the file. |
| B | Drag the outline of the signature box around your signature. Position the baseline under the signature as if you had signed on the baseline. |
Use the following guidelines to position the box and baseline.
- To move the box, select the box to display a border of lines and small squares. Then left‑click and hold and drag the box.
- To size the box, left‑click and drag any of the small squares on the border of the box.
- To move the baseline, move your mouse pointer over the line until the pointer becomes a two‑way arrow (
 ) and then left‑click and hold and drag the line.
After you position the box and the line, you can extract the signature. The extracted signature displays on your computer so that you can make sure it is acceptable. Below is an example.
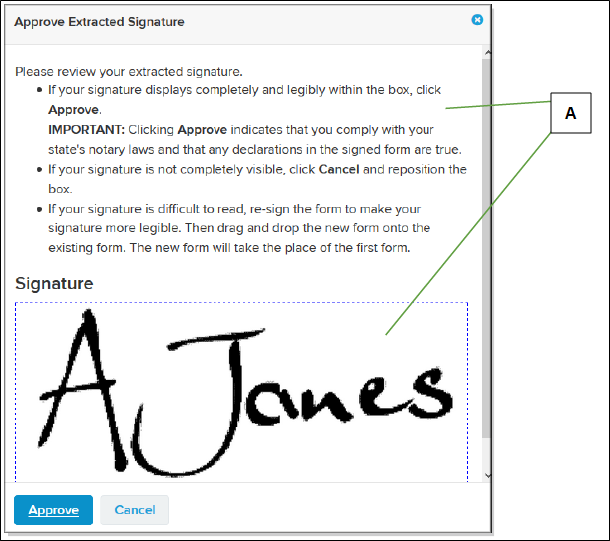
| Letter | Description |
|---|---|
|
A |
Read the suggestions on the Approve Extracted Signature window and review your signature. |
How to set up a digital signature
If you plan to scan a signature, you must have a TWAIN scanner available to your computer and turned on.
The scanner software must be installed on your computer.
A scanned signature must have a resolution of 300 DPI and should be either a .TIFF or PDF.
Drag the edges of the Signature box to position it.
To move the blue line, hover your mouse pointer over it until the pointer becomes a two‑headed arrow.
To remove or change a signature, return to the Click‑Sign Signature page and select Remove Signature or Upload Replacement Signature.
- Scroll to the bottom of the left navigation menu and select your username.
- In the left navigation menu, select My Signature.
- If you have the signed Click‑Sign Signature form saved on a drive that you can access from your computer, skip to step 9 of this task.
- Use the printer icon (
 ) in the upper right corner to print the form.
 - Sign your name in the box on the printed form. Follow these guidelines:
- Use a black medium‑ or bold‑tip pen. If a signature is too light, you may need to start over.
- Stay inside the borders of the box. Your signature cannot touch any of the lines.
- Return to the Click‑Sign Signature page and select Upload.
- On your computer, find and double‑click the file you want to use.
- When the file displays, drag the Signature box to position it over your signature.
- Position the blue line in the Signature box under the main portion of your signature.
- When the positioning looks right, select Extract.
- On the Approve Extracted Signature window, do one of the following:
- If the signature meets the described criteria, select the Approve
 button.
 - To reposition your uploaded signature, select the Cancel
 button. Then return to step 9 of this task.
- If the signature meets the described criteria, select the Approve
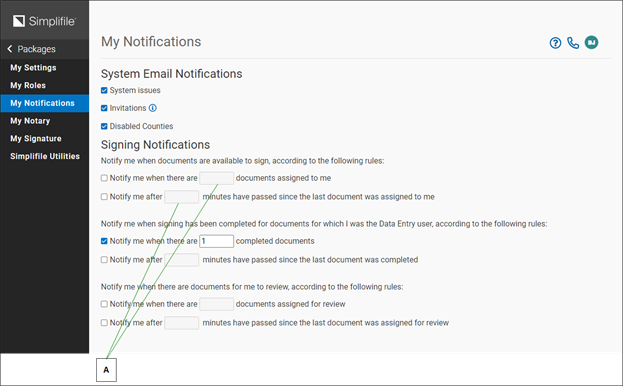
Signing notifications
If you have the necessary permission, you can have Simplifile send you an email message when you have documents available to sign. This is particularly helpful if you log in to Simplifile only to sign documents.
| Letter | Description |
|---|---|
| A | You can choose to receive notifications when you have a specified number of documents available to sign, or when a specified number of minutes have passed since a document was assigned to you. Mark the box and you can choose either option, or both. |
If you choose both options, both criteria must be met before Simplifile sends the notification.
How to set up e‑signing notifications
- In the bottom left corner of Simplifile, select your name.
- In the left navigation menu, select Notifications.
- In the Signing Notifications section, do any or all of the following:
- To have Simplifile send an email when you have a specified number of documents to sign, mark Notify me when I have at least X documents. Then enter the number of documents you want to have in your queue before you are notified.
- To have Simplifile send an email when a document has been in your queue for a specified number of minutes, mark Notify me after X minutes have passed since the last document was assigned to me. Then enter the number of minutes that you want to wait before you are notified.