Feature Enhancements in Version 20.2.0.4 Server Patch 2 (Banker Edition)
This section discusses the updates and enhancements to existing forms, features, services, or settings that are provided in this release.
Updates to the Encompass Server (i.e., Server Patch 2)
Below are updates in the Server Patch (server patch 2) that is applied to the Encompass Server. The Server Patch contains the relevant Encompass code that applies to the following feature enhancement. The Server Patch included with this release will be applied to the Encompass Server automatically and cannot be controlled manually via the Encompass Version Manager tool.
(Added on 12/16/2020)
The Default to URLA 2020 mandate date in Encompass Admin Tools has been updated to 03/01/2021 (from 11/01/2020) in this release. This date determines when the URLA 2020 input forms will be used for all new loans. On or after the date indicated here, the URLA Form Version > URLA 2020 option in new loan files will be automatically selected so that the new URLA 2020 input forms are used for the loan. Prior to this date, the URLA 2009 forms will be used. Authorized users can change this date in the Encompass Admin Tools > Settings Manager > Policies as needed.
This Default to URLA 2020 mandate date was also updated from 11/01/2020 to 03/01/2021 in the Encompass 20.2 Major Release. However, if after upgrading to 20.2 you changed this mandate date back to 11/1/2020, then that date will be overwritten by the new 03/01/2021 default date when you upgrade to the Encompass 20.2 December Service Pack (20.2.0.4 Server Patch 2). If you had changed the default mandate date to any other date besides 11/01/2020 and were using that date for this setting prior to upgrading to this Encompass 20.2.0.4 Server Patch 2 release, that date will be retained and used as your Default to URLA 2020 date. The new default date of 03/01/2021 will not be set in your instance.

NICE-32703
Update to the Encompass Server
(i.e., Server Patch 2) and Client Machines (20.2.0.4)
The Encompass 20.2 December Service Pack release includes the following feature enhancements. In order for these enhancements to be fully integrated into your Encompass system, both the Server Patch and the client-side update provided with this release must be applied. The Server Patch included with this release is applied to the Encompass Server automatically and cannot be controlled manually via the Encompass Version Manager tool. The client-side update in this release can be controlled manually via the Encompass Version Manager tool. If the tool has been configured to always apply client-side updates to users’ computers automatically, users will receive the client-side updates upon their initial log in of Encompass following the release.
Again, the feature enhancements listed below will not be fully implemented until both the Server Patch and the client-side updates are applied to your Encompass system.
Encompass Forms and Tools
The updates described below have been made to the Points and Fees verbiage and the ATR/QM test calculation to reflect the 2021 TILA (Regulation Z) Annual Threshold Adjustments for HOEPA and ATR/QM.
Updated QM Threshold on ATR/QM Qualification Tab
For loans with a Document Signing Date (field ID 1887), Closing Date (field ID 748), or Estimated Closing Date (field ID 763) of 1/1/2021 or later, the calculations shown in the table below are used to populate the Current Qualified Mortgage Fee Threshold amount (field ID QM.X121) or Current Qualified Mortgage Fee Threshold percentage (field ID QM.X122).
|
Loan Amount |
QM Fee Threshold | Current QM Fee Field Populated |
|---|---|---|
|
$110,260 or greater |
3% of the Total Loan Amount (field ID QM.X120) | Threshold amount (field ID QM.X121) |
| $66,156–$110,259.99 | $3,308.00 | Threshold percentage (field ID QM.X122) |
|
$22,052–$66,155.99 |
5% of the Total Loan Amount (field ID QM.X120) | Threshold amount (field ID QM.X121) |
|
$13,783–$22,051.99 |
$1,103.00 | Threshold percentage (field ID QM.X122) |
|
$13,782.99 or less |
8% of the Total Loan Amount (field ID QM.X120) | Threshold amount (field ID QM.X121) |
Updated Verbiage on Section 32 HOEPA
For loans with a Document Signing Date (field ID 1887), Closing Date (field ID 748), or Estimated Closing Date (field ID 763) of 1/1/2021 or later, the following verbiage displays in the Points and Fees Test section on the Section 32 HOEPA Input Form:
For a loan amount of $22,052 or more total points and fees cannot exceed 5% of the total loan amount; For Loan amounts less than $22,052 the total points and fees cannot exceed the lesser of 8% of the total loan amount or $1,103; The dollar amounts used in this test may be adjusted each year, effective January 1.
Updated Section 32 Points and Fees Test
For loans with a Document Signing Date (field ID 1887), Closing Date (field ID 748), or Estimated Closing Date (field ID 763) of 1/1/2021 or later, the percentages shown in the second column below are now populated for the Maximum points and fees allowed percentage (field ID S32DISC.X100) and the calculations shown in the third column are now used to populate the Maximum points and fees allowed amount (field ID S32DISC.X101).
| Loan Amount | Maximum Points and Fees Allowed Percentage | Maximum Points and Fees Allowed Amount |
|---|---|---|
| $22,052.00 or greater | 5% | 5% of the Reg Z Total Loan Amount (field ID QM.X120) |
| $22,051.99 or less | 8% | Lesser of $1,103.00 or 8% of the Reg Z Total Loan Amount (field ID QM.X120) |
CBIZ-33224
Encompass Settings
When using the External Company Setup > Company Details > Banks > Bank Details screen to create and manage warehouse banks with whom your company does business, there is now a TimeZone dropdown field provided.

Select the time zone where the warehouse bank is located. This time zone helps determine when the bank’s purchasing wire cut off time is if it has elected to not receive wires after hours.
The time zone you select here will also be indicated in the TimeZone field that is provided on the Warehouse tab when viewing Warehouse Bank Details. (To view this tab and this field, go to Encompass Settings > External Company Setup > Third Party Originators > Company Details > Warehouse tab.)

A new Standard Web Forms section has been added to the LO Connect tab in the Personas setting. Here, Encompass administrators can select the correspondent input forms and the Home Counseling Providers Information input form. The forms selected here will display under the Standard Forms menu in the left navigation of Encompass LO Connect for the selected persona. Only those users who have been assigned with the selected persona will be able to access these forms in Encompass LO Connect.

To Enable a Form in Encompass LO Connect for a Persona:
- In Encompass Settings, go to Company/User Setup > Personas.
- In the left panel, select a persona.
- Click the LO Connect tab.
- In the Standard Web Forms section, select the checkbox for each form you want to display in LO Connect for the persona.
- Save your changes.
NICE-31648
Currently in Encompass, when a loan is priced with a PPE, the lock request data can be edited before the lock request is submitted. This can cause the lock request data to be out of sync with the data used to price and qualify the loan. In this release, a new Do not allow changes after pricing has been retrieved setting has been added to the Product and Pricing setting to prevent changes to the Lock Request Form before the lock request is submitted.
In addition, the section header has been updated from "Elapsed Time Setting Between Product and Pricing and Lock Request" to "Lock Request Submission After Pricing has been Retrieved".

Updates to the Encompass Client Machines
The Encompass 20.2 December Service Pack release includes the following enhancements, which are client-side updates that are applied to users' Encompass client machines. This client update can be controlled manually via the Encompass Version Manager tool. If the tool has been configured to always apply new releases to users’ computers automatically, users will receive this update upon their initial log in of Encompass following the release.
New Enhancements for Enhanced Conditions
In Encompass 20.2, the new Enhanced Conditions feature was introduced. Enhanced conditions are conditions that can be created and used to support condition customization at a condition level and field level, and to enable condition reports to be generated across multiple loans (both of which are not currently supported by the standard conditions provided in earlier versions of Encompass). The enhanced conditions are available for authorized loan team members working on loans in Encompass and Encompass LO Connect.
In this Encompass 20.2 December Service Pack release, additional enhancements to enhanced conditions are being provided, including:
- New Conversion Tool for Converting Standard Conditions to Enhanced Conditions
- Preliminary, Underwriting, and Post-Closing enhanced condition types are now provided by default to make it easier to replicate these types of standard conditions used in earlier versions of Encompass.
- Enhanced Conditions now supported in Encompass Investor Connect
A new tool is now available that enables administrators to convert existing standard conditions that you use in earlier versions of Encompass to new enhanced conditions. This conversion tool is provided in Encompass Admin Tools and it makes it easy to convert standard conditions to enhanced conditions without requiring significant manual input by the administrator.
With this conversion tool in place, and the enhanced conditions migration tool that was introduced in Encompass 20.2, you can easily convert standard conditions to enhanced conditions, and then migrate the enhanced conditions to a production environment when you are ready to enable enhanced conditions for your company’s loan team members. For example, one recommended approach is that you log into a test instance where your standard conditions are used, and then use the conversion tool to convert those conditions to enhanced conditions. You could then finalize your enhanced conditions settings and test them here or in another test environment. When you are ready to make the enhanced conditions available to loan team members in the Encompass eFolder or Encompass LO Connect in a production instance, you can migrate your enhanced conditions to the production instance, and then activate the enhanced conditions you want to make available to loan team members.
Prerequisites
In order to successfully convert standard conditions in an instance to enhanced conditions, the following prerequisites must be met:
-
The condition type for each enhanced condition must be defined and named in the instance where you are converting standard conditions to enhanced conditions. The enhanced condition types must include the same options for the condition’s Category, Prior To, Source and Recipient values that are being used for the standard condition.
-
The documents associated with the enhanced condition(s) must be defined and named.
-
The user roles associated with the enhanced condition must be defined and named. The role(s) assigned to the condition must be the same for standard conditions and enhanced conditions.
To Convert Standard Conditions to Enhanced Conditions:
- On your Windows task bar, click the Start menu or Start icon, navigate to the Ellie Mae Encompass program folder, and then click Admin Tools.
- Double-click the Enhanced Conditions Tool.
- The Enhanced Conditions Tool displays with two options: Convert Standard to Enhanced Conditions and Migrate Enhanced Conditions between Instances. Click to select the Convert Standard to Enhanced Conditions option, and then click Next.

- You will be prompted to log into the Encompass instance where you want to convert your standard conditions to enhanced conditions. Type the Instance ID, User ID, and Password that you use to log into the Encompass instance as the administrator user, and then click the Log In button.
-
If your company is utilizing Single Sign-On (SSO) features, use the Login via Single Sign On (SSO) button and log in using your identity service provider.

The conversion tool will review all of the standard and enhanced conditions in the Encompass instance, and then load the standard conditions in the tool. A list of the standard conditions is presented like this one below.
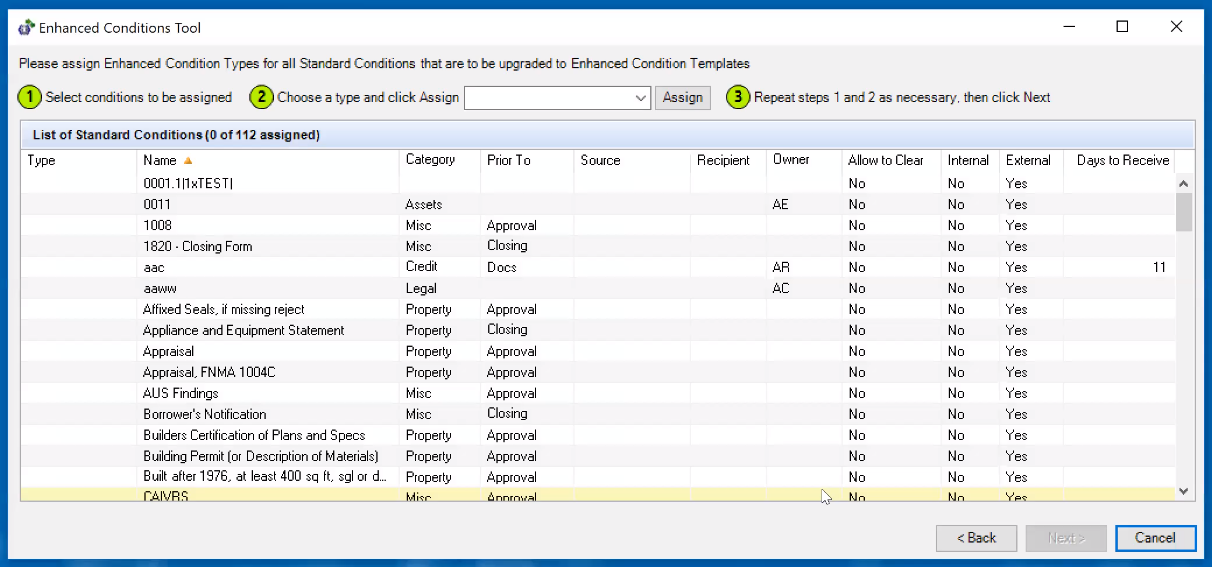
- Click to select one or more standard conditions in the list. Note that you can click the column headers to sort the standard conditions list as needed.
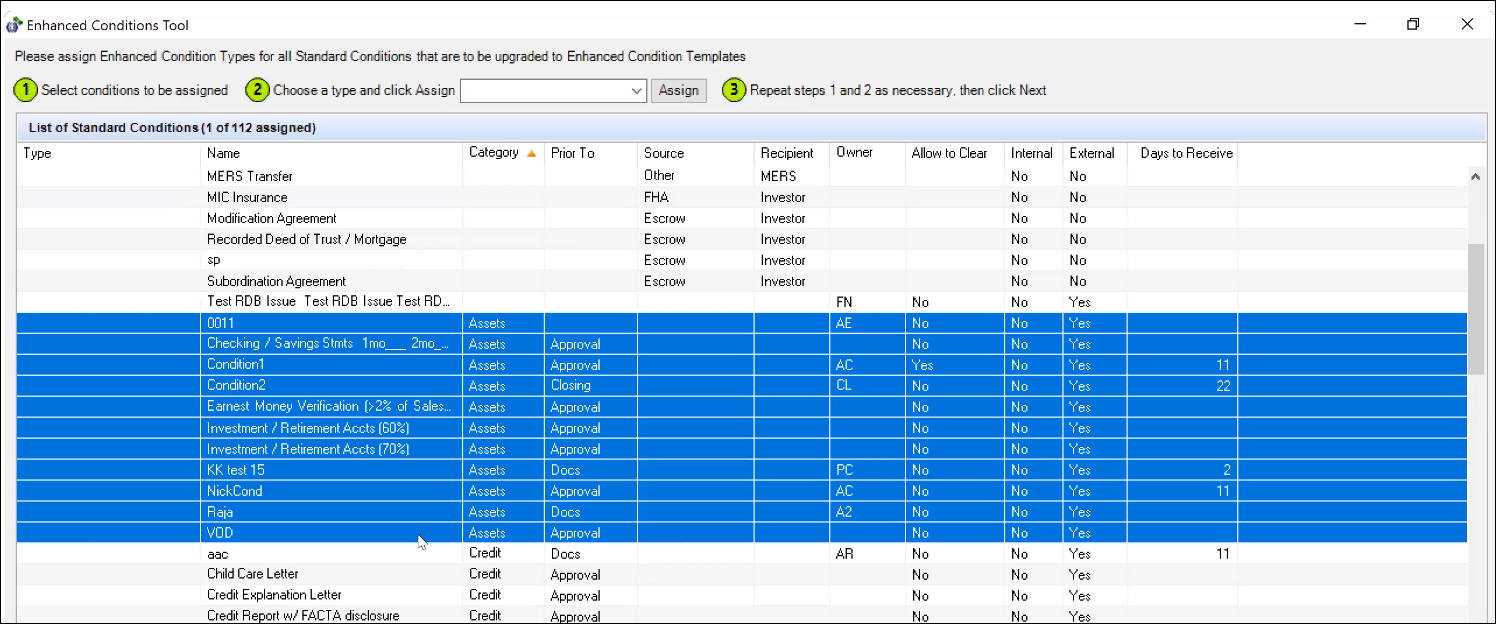
You can select multiple standard conditions (using the Alt-click method to pick individual conditions from the list of Shift-click to pick a group of conditions) and then assign an enhanced condition type to all of the selected conditions.
For this example, we will select all of the “Asset” standard conditions for conversion.
- Next, click the dropdown list at the top of the screen, and then select the enhanced condition type that you want the selected standard condition to be converted to. (The condition types provided in the dropdown list are defined by the administrator using the eFolder Setup > Enhanced Conditions setting.)

- After you select the enhanced condition type, click the Assign button.
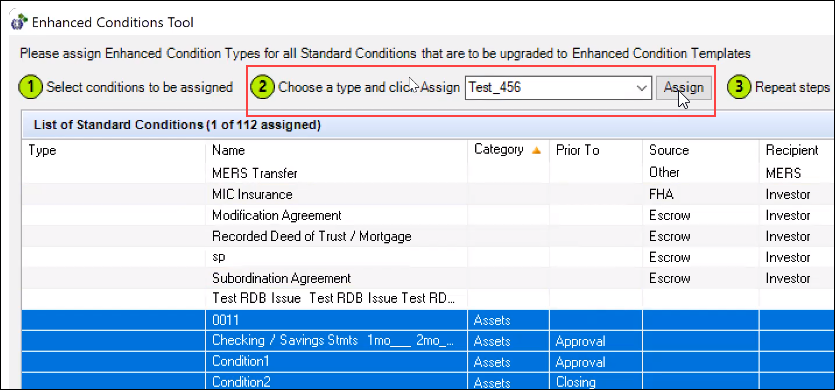
When you assign the enhanced condition type, it is then displayed in the Type column for the selected condition(s).

- Repeat steps 5 – 7 to assign additional standard conditions with new enhanced conditions types.
- Once you have finished assigning enhanced conditions types, click Next at the bottom of the screen.
When you assign an enhanced condition type to one or more standard conditions, you may encounter alerts in one or more of the table columns. These alerts notify you about invalid or missing values for the selected enhanced condition type. Typically, these alerts are only triggered if the enhanced condition type settings have been modified from their default settings and a Category, Prior To, Source, or Recipient option has been removed. Refer to the Working with Alerts section below for more information. These types of alerts must be addressed and cleared in order to proceed with the conversion.
There are Preliminary, Underwriting, and Post-Closing enhanced condition types provided by default in the enhanced condition types dropdown list that you can assign to standard conditions. These enhanced condition types have been set up to mirror the options defined in these types of standard conditions. Use these options to help reduce the chance of encountering invalid or missing value alerts and reduce the need to create new enhanced condition types. For example, you could assign the Preliminary enhanced condition type to standard preliminary conditions in the conversion tool. Once converted in the tool, these enhanced conditions will feature the same configuration as the standard conditions did and no other customization would be required.
- After clicking Next, the selected standard conditions are converted. Click Exit to exit the conversion tool.

When the standard conditions have been successfully converted, the conditions are then available in the eFolder Setup > Enhanced Conditions settings in Encompass Settings. The newly converted conditions are not activated by default. You must go to the eFolder Setup > Enhanced Conditions setting, select the condition in the Conditions list, and then click Activate to activate the enhanced condition and make it available to loan team members working on applicable loan files.


![]() Unassigning an Enhanced Condition Type From a Standard Condition
Unassigning an Enhanced Condition Type From a Standard Condition


Encompass Investor Connect now supports enhanced conditions, which were introduced in November 2020 with the initial Encompass 20.2 major release. Enhanced conditions enable lenders to define their own conditions and configure the workflow for handling these conditions.
Before you can use enhanced conditions, Ellie Mae must enable the Enhanced Conditions feature in your company’s environment and your partner must enabled the workflow for sending and receiving conditions. Enhanced conditions are used for all loan files created after the Enhanced Conditions feature is enabled. Loans created prior to enabling Enhanced Conditions will continue using standard conditions.
If your company has enabled Enhanced Conditions, the Investor Delivery condition type can now be used for conditions associated with packages sent to partners via Encompass Investor Connect. A new workflow has been implemented for creating and importing Investor Delivery condition types.
For detailed information about configuring and using Enhanced Conditions with Encompass Investor Connect, refer to the Encompass Investor Connect 20.2 December Service Pack release notes.
Investor Delivery conditions are a type of Enhanced Condition used by lenders who are working with partners via Encompass Investor Connect. To accommodate the unique circumstances of these conditions, a different set of rules and limitations has been implemented in the Enhanced Conditions setting (Encompass > Settings > eFolder Setup > Enhanced Conditions) for configuring Investor Delivery condition types.

Click the Condition Types button. On the Condition Type Settings window, a default Investor Delivery condition type displays on the window for user who have granted persona access. By default, the Status is set to Active, but administrators can deactivate it as needed.

Permission to manage the Condition Type Settings is granted via the top-level Access Conditions checkbox shown below in the Personas setting. (Encompass Settings > Company/User Setup > Personas > Enhanced Conditions tab)

The Investor Delivery condition type cannot be deleted, and the Investor Delivery condition type name is reserved specifically for the default type. The following error message displays when an administrator attempts to add a Condition Type with the Investor Delivery name:
This is a system reserved condition type. Please select another name for your condition type.
Additionally, administrators cannot create or edit Enhanced Condition Templates for the Investor Delivery condition type.
On the Condition Type Settings window, double-click Investor Delivery to open the Edit a Condition Type window.

The Add and Delete icons are disabled in the Tracking Options Status section, but administrators can clear or select the five checkboxes that are not disable by default. All other sections (Prior To, Category, Source, Recipient, and Tracking Owners) are editable.
The following pre-configured values are available on the Edit a Condition Type window.
Category:
- Asset
- Credit
- Income
- Legal
- Miscellaneous
- Property
Prior To Options:
- Funding
- Approval
- Closing
- Purchase
- Docs
Source:
- AmeriHome
- Caliber
- Chase
- Colorado Housing & Finance Authority (CHFA)
- Flagstar
- Franklin American
- Home Point Financial
- MAXEX
- Mr. Cooper
- NewRez Correspondent
- The Money Source
- Wells Fargo Funding
- Texas Capital Bank
Recipient:
- AmeriHome
- Caliber
- Chase
- Colorado Housing & Finance Authority (CHFA)
- Flagstar
- Franklin American
- Home Point Financial
- MAXEX
- Mr. Cooper
- NewRez Correspondent
- The Money Source
- Wells Fargo Funding
- Texas Capital Bank
When investor delivery conditions are received through the bi-directional API, and imported into Encompass, source and recipient will be populated with name of partner condition was received from (Example Wells Fargo Funding)
Tracking Options Status:
- Added
- Fulfilled
- Requested
- Re-requested
- Received
- Reviewed
- Rejected
- Closed
- Waived
When a user adds an Investor Delivery condition from the eFolder using the Blank option, the source is populated with Manual and the recipient selection is blank.
Migration:
The Investor Delivery condition type for Enhanced Conditions was enabled with the Encompass 20.2 release but the Encompass Investor Connect service did not add support for Investor Delivery condition types until the Encompass 20.2 December Service Pack release. For this reason, the product documentation provided with the Encompass 20.2 release advised lender not to create Investor Delivery condition types until the December Service Pack was available. If you did create an Investor Delivery condition type prior to the December Service Pack release, Encompass will not replace it with the new Investor Delivery condition type. However, the logic for populating and editing data on the Condition Details window for Investor Delivery conditions will follow the same logic used for conditions created using the December Service Pack Investor Delivery condition type. For detailed information about the Conditions Details window for Investor Delivery conditions, refer to the Encompass Investor Connect 20.2 December Service Pack release notes.
NICE-30407, NICE-30239
When managing enhanced conditions in Encompass, the Add a Condition Type Setting screen is used to indicate the enhanced condition’s name and details about the condition including the milestones that must be met prior to the condition being addressed and the source options that identify the individual from whom the condition may come. In this Source Options section, the Manual, Condition Set, and Automated Conditions options have been removed from the default list of options. A new Escrow option is now provided in this Source Options list.

In addition, the Condition Type Settings screen now provides Preliminary, Underwriting, and Post-Closing types by default. These types are set to Active by default, but they can be deactivated by the administrator. These enhanced condition types have been set up to mirror the options defined in these types of standard conditions.

These Preliminary, Underwriting, and Post-Closing names are reserved for use for these types of enhanced conditions only. If the administrator tries to name a different type of condition with one of these, the system will not allow it and a message will be presented to the administrator explaining that the name is reserved for a particular condition type.
In addition, when one of these types of conditions is being edited in the Edit a Condition Type Setting screen, a new Legal option is listed in the Category Options section and a new Escrow option is listed in the Source Options section.

NICE-32213, NICE-32965
Updates for URLA
The Total Income (field ID 101) on forms such as the Borrower Summary – Origination and the Transmittal Summary is now updating as expected when an amount is entered for the Monthly Income (or Loss) (field ID FE0056) in the Additional Self-Employment Income section on the 1003 URLA Part 2 input form. Previously the calculation update was not being triggered when an amount was entered in this field.
Workaround Information:
The following workaround was provided for this production issue and is no longer required for Encompass 20.2.0.4 and later:
- To trigger the total income calculation, open any Verification of Employment (VOE) record that is not for self-employment, change the Base Pay amount (field ID BEXX19), and then change it back to the original value.
CBIZ-29890
For Purchase loans using the URLA 2009 forms, the calculation for the Reserves amount (field ID CASSRN.X78) on the Freddie Mac Additional Data and the Underwriter Summary input forms now exclude the Total Payoffs and Payments amount (field ID CD3.X80). Previously the Reserves amount was not excluding payoffs listed in the Verification of Liabilities (VOL) records for debts identified as being paid at closing and included on the Payoffs and Payments table. This resulted in the Reserves not calculating correctly for DU and LP when there was a payoff involved in a purchase. These funds are now being factored into the funds required to close and are being used correctly when qualifying the borrower with appropriate reserves.
CBIZ-31069
Encompass Forms and Tools
The FHFA Maximum Conforming Loan Limits for 2021, announced on November 24, 2020, have been incorporated into the Encompass Conventional County Limit tables. These changes will be effective on January 1, 2021. Encompass uses the Application Date (field ID 745) to determine the year to use when applying data from the Conventional County Limits table. If the Application Date is blank, Encompass uses the current date.
CBIZ-35970
Four new Title fields (field IDs VEND.X1049, VEND.X1050, VEND.X1051, and VEND.X1052) have been added to the Custom Category entries in the File Contacts tool to support the use of titles for Lender Representatives when applying electronic signatures used in the eClose process.
The eClose functionality is scheduled for release in a future version of Encompass.

When one of the custom category file contacts is selected, the Title field display in the details in the lower panel.

A new Current Assigned Title field (field ID 4683) has also been added to the following forms and is populated with the from the File Contacts when a custom category entry is selected for the Lender Representative.
-
Closing RegZ
-
RegZ-TIL
-
RegZ-CD
-
RegZ-LE

CBIZ-34146
Most Encompass fields that were previously formatted as String fields and that allowed a user to enter either a Y or N option have been updated to use the YN format. The following field IDs are affected by this update:
| 675 | FCE0009 | FE0550 |
| 1530 | FCE0015 | FE0609 |
| 1538 | FE0109 | FE0615 |
| BE0009 | FE0115 | FE0650 |
| BE0015 | FE0150 | SYS.X116 |
| BE0036 | FE0209 | SYS.X117 |
| BE0038 | FE0215 | SYS.X126 |
| CE0009 | FE0250 | SYS.X127 |
| CE0015 | FE0309 | URLA.X40 |
| CE0036 | FE0315 | URLA.X41 |
| CE0038 | FE0350 | URLA.X199 |
| CORRESPONDENT.X29 | FE0409 | URLA.X200 |
| CORRESPONDENT.X58 | FE0415 | URLA.X201 |
| DISCLOSURE.X961 | FE0450 | URLA.X202 |
| DISCLOSURE.X962 | FE0509 | URLA.X203 |
| FBE0009 | FE0515 | URLA.X204 |
| FBE0015 |
After updating to the Encompass 20.2 December Service Pack release, using the Encompass SDK to set the field value to something other than YN for these fields will throw an exception.
CBIZ-33055
To avoid having dates affected by time zone differences, the formatting for the following Encompass fields have been updated from DATETIME format to DATE format:
-
Correspondent Master Policy Hazard: Policy Effective Date (field ID CORRESPONDENT.X408)
-
Correspondent Master Policy Hazard: Policy Expiration Date (field ID CORRESPONDENT.X409)
-
Correspondent Master Policy Flood: Policy Effective Date (field ID CORRESPONDENT.X414)
-
Correspondent Master Policy Flood: Policy Expiration Date (field ID CORRESPONDENT.X415)
-
Correspondent Master Policy Wind/Hail: Policy Effective Date (field ID CORRESPONDENT.X420)
-
Correspondent Master Policy Wind/Hail: Policy Expiration Date (field ID CORRESPONDENT.X421)
-
Correspondent Master Policy Other: Policy Effective Date (field ID CORRESPONDENT.X427)
-
Correspondent Master Policy Other: Policy Expiration Date (field ID CORRESPONDENT.X428)
-
Correspondent SAR Expiration Date (field ID CORRESPONDENT.X435)
-
Correspondent Conversion/Modification Date (field ID CORRESPONDENT.X436)
-
Correspondent First Rate Change Date (field ID CORRESPONDENT.X448)
-
Correspondent Borrower VVOE Work Number Date (field ID CORRESPONDENT.X459)
-
Correspondent Co-Borrower VVOE Work Number Date (field ID CORRESPONDENT.X460)
-
Credit Report Co-Borrower Date (field ID CCRED0004)
-
Credit Report Borrower Date (field ID BCRED0004)
These fields were created for correspondent lending purchased. They do not display on existing Encompass input form, but they can be added to custom input forms and reports.
Migration:
After upgrading to Encompass 20.2 December Service Pack, the dates in these fields are not updated to the new format for loans created prior to the Encompass 20.2 December Service Pack release.
CBIZ-34761
The following new repeatable fields have been added to Encompass for correspondent lending purposes to enable lenders to capture multiple records for Other Insurance. Repeatable fields can be used to capture the same type of information for multiple records. These field do not display on any Encompass existing input forms but can be added to custom input forms and are available in the Encompass Reporting Database.
-
Included in Master Policy? (field ID CORROI0001)
-
Company Name (field ID CORROI0002)
-
Company Street Address (field ID CORROI0003)
-
Company City (field ID CORROI0004)
-
Company State (field ID CORROI0005)
-
Company Zip Code (field ID CORROI0006)
-
Company Contact Name (field ID CORROI0007)
-
Company Phone Number (field ID CORROI0008)
-
Company Fax Number (field ID CORROI0009)
-
Policy Type (field ID CORROI0010)
-
Policy Type Other Description (field ID CORROI0011)
-
Premium Amount (field ID CORROI0012)
-
Premium Due Date (field ID CORROI0013)
-
Replacement Value (field ID CORROI0014)
-
Insurance Escrowed? (field ID CORROI0015)
-
Additional Coverage Amount (field ID CORROI0016)
-
Property Value Used for Insurance (field ID CORROI0017)
-
Guaranteed Replacement Cost? (field ID CORROI0018)
-
Insurance Estimator? (field ID CORROI0019)
-
Maximum Deductible Percentage (field ID CORROI0020)
-
Maximum Deductible Amount (field ID CORROI0021)
-
Policy # (field ID CORROI0022)
-
Insurance Effective Date (field ID CORROI0023)
-
Insurance Expiration Date (field ID CORROI0024)
-
Coverage Amount (field ID CORROI0025)
-
Company State Comments (field ID CORROI0026)
A standard naming convention is used to assign a field ID to each of the repeatable fields. The field ID includes a component that identifies it as an Other Insurance field (CORROI) followed by a set of two digits associated with the individual record and a final set of two digits that identify the specific field.
Example: The generic field ID for the Correspondent - Other Insurance - Included in Master Policy? field is CORROI0001.
-
The first six letters in the field ID identity the field as an Other Insurance field: CORROI0001
-
The next two digits identify the number of the record: CORROI0001
-
The last two digits in the field ID identify the specific Other Insurance field: CORROI0001
CBIZ-34298
To remain consistent and compliant with the HMDA LAR update announced by the CFPB in August 2020 and effective on January 1, 2021, an option for 7. Internal Proprietary System has been added to the following five dropdown lists in the Risk Assessment section of the HMDA Information input form:
-
AUS #1 (field ID HMDA.X44)
-
AUS #2 (field ID HMDA.X45)
-
AUS #3 (field ID HMDA.X46)
-
AUS #4 (field ID HMDA.X47)
-
AUS #5 (field ID HMDA.X48)

The 7. Internal Proprietary System option is available with this Encompass 20.2.0.4 Server Patch 2 release but will not be officially accepted for HMDA LAR purposes until 1/1/2021.
CBIZ-34112, CBIZ-35290
(Updated on 12/11/2020)
When the new Do not allow changes after pricing has been retrieved setting is enabled, pricing is returned to the Lock Request Form, and Auto-Lock is disabled, the following behavioral updates to the Lock Request Form will be triggered:
- For New Lock and Re-Lock requests, all pricing fields and buttons will be disabled except:
The behavior of the remaining fields will be updated in a future release.
- Comments (field ID 2144)
- Submit Request button
- If the Reset button is selected, a prompt “Pricing data will be lost from this form with a reset. Are you sure you want to reset this form with loan information?” is displayed.
- Yes – Clears all pricing data and all fields and buttons previously disabled will be enabled.
- No - Closes the prompt, exits you from the form, and disables the Comments field, Submit Request button, and Reset button.
- If the Request Type is “Re-Lock”, the Reset button will revert the Lock Request Form back to the pricing from the last confirmed snapshot, except the Pricing Updated on (field ID 3039) will be cleared.
- If you navigate away from the Lock Request Form, a warning “You have received pricing on this [lock/relock]. If you navigate away without first submitting your request, the pricing will be lost. Do you wish to continue?” is displayed.
- Yes – Clears all pricing data and all fields and buttons previously disabled will be enabled.
- No - Closes the prompt, exits you from the form, and disables the Comments field, Submit Request button, and Reset button.
- If the Request Type is “Re-Lock”, the Reset button also clears the Pricing Updated on (field ID 3039).
- There are no behavioral changes when pricing data is manually entered.
- After a New Lock request is submitted, the Pricing Updated on (field ID 3039) is cleared whether the Do not allow changes after pricing has been retrieved setting is enabled or not.
Encompass Settings
(Added on 12/11/20)
Configuring Settings for Task-Based Workflows
Administrative settings are being introduced in this release and the Encompass LO Connect December 20.2 Service Pack release that can be used to configure the new workflow tasks, sub-tasks, and task groups that will enable loan team members in Encompass LO Connect to more effectively manage and automate tasks across the entire loan lifecycle and adopt an exception-based workflow.
The initial phase of the task-based workflow options provides the configuration settings for administrators in Encompass and Encompass LO Connect. However, the loan team members working in loans in Encompass LO Connect will not actually be able to access or manage these workflow tasks until a future Encompass LO Connect release. The goal of including the administrative settings for task-based workflows in the 20.2 December Service Pack releases is to enable lenders to configure and validate their task-based workflows only. It is not intended to enable loan team members to access and manage these tasks when working in loan files. It is recommended that the settings configuration be performed in an Encompass test environment only, not in a production environment.
Refer to the Working with Task-Based Workflows setup guide for detailed information about the benefits of using task-based workflows, setting up workflow tasks, setting up new Encompass LO Connect task workspaces, and provides examples of how loan team members can access and manage workflow tasks and sub-tasks.
In order to utilize task-based workflows, there are administrative settings in Encompass and Encompass LO Connect that must be configured. Once these settings are in place, then the assigned loan team members will be able to access and address the required workflow tasks when working with loans in Encompass LO Connect.
The following settings in Encompass Settings must be configured for task-based workfows. These settings are available to all administrators by default in Encompass 20.2.0.4 Server Patch 2.
The Encompass Settings area has been updated with the following settings for task-based workflows:
-
Personas Configuration – Configure the Persona settings for users to determine who can access the Workflow Task features.
-
Milestone Completion Business Rule Configuration – Configure Milestone Completion business rules in Encompass with new Workflow Tasks.
Follow these steps to set up Persona permissions and Milestone Completion business rules in Encompass.
Persona Configuration
Personas represent job functions in your company. Each persona defines access to functions, forms, and tools. One or more personas can be assigned to each user. Use the Standard Features options in the LO Connect personas settings to determine the users who can access and manage workflow tasks in Encompass LO Connect.
To Assign Persona Access for Workflow Tasks:
-
On the menu bar, click Encompass, and then click Settings.
-
On the left panel, click Company/User Setup, and then click Personas.
-
In the Create a persona panel, select the persona you want to update.
-
Select the LO Connect tab.
- In the Standard Features section, select the workflow tasks options to determine how the persona can access workflow tasks in Encompass LO Connect. Based on these persona settings, the users assigned with the persona will be able to access these task-based workflow items in the left navigation menu in Encompass LO Connect.

- When finished, click the Save icon.
- Users granted with access to the Workflow Tasks Tool option can access the Workflow Tasks tool from the left navigation within a loan.
Adding Workflow Tasks with the Milestone Completion Business Rules Setting
Administrators use the Milestone Completion tool to define and manage requirements that must be met before a milestone is finished. You can specify a condition for applying the rule, documents that must be received, and fields that are required. For example, you can create a milestone rule that requires that the credit report has been received before the File Started milestone can be marked as Finished.
To Add Workflow Tasks:
-
On the menu bar, click Encompass, and then click Settings.
-
On the left panel, click Business Rules, and then click Milestone Completion.
-
On the Milestone Completion tool, click the New icon.
- Or, to edit an existing rule, click the Edit icon.
You can elect to create a new milestone completion rule where you will then add new workflow tasks or you can edit an existing milestone completion rule and add new workflow tasks. These steps are for creating a new rule, but the remaining steps in this process are the same when creating a new rule or editing an existing rule. Milestone tasks and workflow tasks can coexist as you manage your transition to using task-based workflows.
-
Select all the Channels this rule applies to.
-
Indicate if there is a condition for the rule (i.e., will the rule always be applied or will the rule only be triggered if the specified condition occurs in the loan).
-
In the Select required documents, fields, and tasks for each milestone section, click the Required Tasks tab.
-
Click the Add button.
-
In the Add Tasks window, click the Workflow Tasks tab.

-
This tab lists the available task groups and tasks in hierarchical order. Select one or more tasks in this list.
-
In the For Milestone dropdown list, select the milestone where the milestone completion rule will be applied, and then click OK.

The selected workflow tasks are displayed with a clipboard/checklist icon on the Required Tasks tab to differentiate these workflow tasks from the other required tasks required for the milestone completion rule.

If a Workflow Task Template that has been added to a milestone completion rule is later deleted or if the Type ID is later updated, then the workflow task will continue to be displayed on the Required Tasks tab, but the workflow tasks template’s Type ID will be displayed with an error icon and a description of the issue.
Even though this deleted/updated task displays with an error on the Required Tasks tab, it’s not considered to be a part of the milestone completion rule and it will not display for the loan team member in the Loan Log when the rule executes in the loan. These deleted tasks will not be required to complete this milestone. However, this deleted/updated task will still display on the Required Tasks tab in the rule, but it will be greyed out with an error icon. The administrator will have to manually remove this task from the milestone completion rule in order for it to no longer display on the Required Tasks tab in the rule with an error icon.

- When finished, click the Save button.
Once you have added the workflow tasks to the milestone completion rule, you must first activate the milestone completion rule in order for loan team members to see and address this business rule when working in applicable loans in Encompass and Encompass LO Connect. In order to activate the rule, select the milestone completion rule in the Milestone Requirements list, and then click Activate.

As discussed at the beginning of this entry, while the task-based workflow administrative settings are now available in Encompass 20.2.0.4 Server Patch 2 and later, loan team members will not be able to complete the workflow tasks in a workspace in Encompass LO Connect until a future release. Therefore, you should not activate any Milestone Completion rules that you have configured with new workflow tasks in Encompass 20.2.0.4 Server Patch 2. Activating one of these rules will result in the rule being enforced in the loan. Encompass LO Connect loan team members will be able to view the rule and the required tasks, but they will not be able to complete the required workflow tasks that are required to clear the milestone completion rule. (Note that only users assigned with the Administrator or Super Administrator persona will be able to complete the workflow tasks required for the rule in Encompass LO Connect.)
When setting up TPO information in the External Company Setup > Company Details > Third Party Originators > Company Details settings, the Basic Info tab provides a Yrs in Business field, located in the Business Information section of the tab, that calculates the TPO’s years in business based on the current date and the date entered in the Date of Incorporation field. In this release, the number of months is now calculated and indicated in this field along with the number of years. In previous releases, only the number of years was displayed here and it was rounded off. If the Date of Incorporation is set with a future date, this field will display as 0 Year 0 Months. Otherwise, the number of years and months in business will display here, based on the date entered in the Date of Incorporation field.

The landing page that displays for the Investor Connect Settings (Encompass > Settings > External Company Setup > Investor Connect Settings) has been redesigned to provide easy access to all Investor Connect Settings options. Previously the various configuration options for Investor Connect were accessed via a series of tabs across the top of the landing page. The tabs have been replaced with four entries with explanatory onscreen text and buttons for each of the feature that can be configured in this setting. This setting is used only by lenders who are using the Encompass Investor Connect service.

From this landing page, the administrator can click toggle buttons to enable or disable each of the following four features. The toggle buttons are set by default to Off for all four features.
-
Auto Import – This is a new setting feature.
-
Batch Delivery
-
Conditions Delivery
-
Email Notification
Administrators can click the Gear icons for Auto Import and Conditions Delivery to configure additional options for these features. For detailed information about configuring these new and updated settings, refer to the Encompass Investor Connect 20.2 December Service Pack release notes.
The Ellie Mae AIQ tab is now visible in the Personas setting (Encompass > Settings > Company/User Setup > Personas) only when an Encompass customer has a valid Ellie Mae AIQ license. The tab will not be visible for companies that do not have a valid Ellie Mae AIQ license.

DOCP-15278
A new Ellie Mae AIQ checkbox has been added to the Settings tab in the Personas setting (Encompass > Settings > Company/User Setup > Personas). Administrators can select or clear this checkbox to configure a persona’s access to the Ellie Mae AIQ setting (Encompass > Settings > Additional Services > Ellie Mae AIQ) where a user can manage the credentials used to access the Ellie Mae AIQ service.

DOCP-15199
| Next Section: Fixed Issues | ||
| Previous Section: New Features & Forms |