Manage the Services Settings
Use the Services Settings to enable services in the loan application that improve applicant experience and streamline the loan application process, including credit ordering, product and pricing, automated underwriting, asset verification, Velocify, and employment and income verification. Some services have additional settings that are configured at the workflow level. If a service has additional settings, Encompass Consumer Connect displays them after you enable the service.
When you enable a service (not the Underwriting service), Encompass Consumer Connect prompts you for permission to automatically enable the required fields to run the service successfully. Encompass Consumer Connect does not check for the ICE PPE service. After enabling the fields, each field's Show checkbox is replaced with the Services On icon  on the Loan App Settings page. To view a list of required fields, efer to Encompass Consumer Connect Services Dependencies Field Guide.
Important Information About Enabling the Underwriting Service
When the Underwriting service is enabled, Encompass Consumer Connect does not automatically update the Loan App Settings or check to ensure the required fields are displayed in the application. For the Underwriting service to run successfully, administrators must make sure all dependent fields listed in the efer to Encompass Consumer Connect Services Dependencies Field Guide. for the Underwriting service are enabled in the application.
If you activate the Assets service settings (Asset Verification and Asset Verification Authorization) or the Employment and Income service setting (VOE/VOI Authorization), you will be prompted to show the corresponding hidden sections in the loan application. For more information, refer to Modify Loan Application Elements.
To configure the services settings, expand the Services Settings section.
To Enable Services in a Workflow
-
To activate the service, click the service toggle setting to Yes.
If the service has not been set up in Services Management, the Yes/No toggle will be dimmed. To learn how to set up the service, see Managing Services.
-
Click Save.
In this section, you will enable the service that allows applicants to order credit reports when applying, prompting the applicants to enter authentication credentials for the selected credit provider. When selecting a provider, be sure to update the underwriting service settings. If you do not select a provider, the system defaults to the site level provider.
When the required borrower data has been collected, the loan application can trigger the Credit Order service. The credit ordering functionality now resides in the Liabilities section, providing a single location to capture Authorization and automatically trigger the credit order once Authorization is provided. Depending on your workflow settings, borrowers will still be able to enter liabilities manually. The minimum required fields that must be present in the loan application to automatically trigger the order credit when enabled are as follows:
-
Borrower / Co-Borrower First Name, Last Name
-
Borrower / Co-Borrower Social Security Number
-
Borrower / Co-Borrower Date of Birth
-
Current Address (Address Line 1, City, State, Zip Code)
For joint applications, the co-borrower information is required.
To Configure the Credit Ordering Service
-
To activate the credit ordering service, do the following:
-
Click the Order Credit toggle setting to Yes. By default, Encompass Consumer Connect selects the credit provider configured in Services Management > Order Credit Settings. For more information, see Managing Services.
-
For a different credit provider, click the Credit Provider drop-down, click the credit provider, and then complete the credit provider form, which may include the ID, subscriber ID, username and password, report type, etc. For more information, see New Option to Designate Specific Credit Service Providers for Individual Loan App Workflows.
-
-
To allow applicants to pay for the credit report, click the Borrower Pays for Credit Report toggle setting to Yes.
-
To enable applicants to authorize credit, click the Credit Authorization toggle setting to Yes. By default, the Credit Authorization toggle setting is automatically set to Yes.
-
To require applicants to accept the credit authorization agreement in order to continue with the loan application, click the Credit Authorization Agreement Required toggle setting to Yes. Review the warning message and then click Continue.
Enabling this option changes the default setting and will require applicants to authorize a credit check in order to submit a loan application. This change may violate applicable state and federal laws. We strongly recommend consulting your compliance counsel before making this change.
-
In the Credit Authorization Agreement, review and edit the contents of the authorization agreement. To revert the text to the default, click Reset to Default.
-
Click Save.
To Understand the Dynamic Credit Ordering Process
Administrator Configuration
Regardless of workflow type (Customizable, Traditional, or Home Equity), the configuration process and options remain the same, allow the administrator to activate the Order Credit toggle to use the dynamic credit ordering or only activate the Credit Authorization toggles to allow borrowers to manually add liabilities and other expenses.
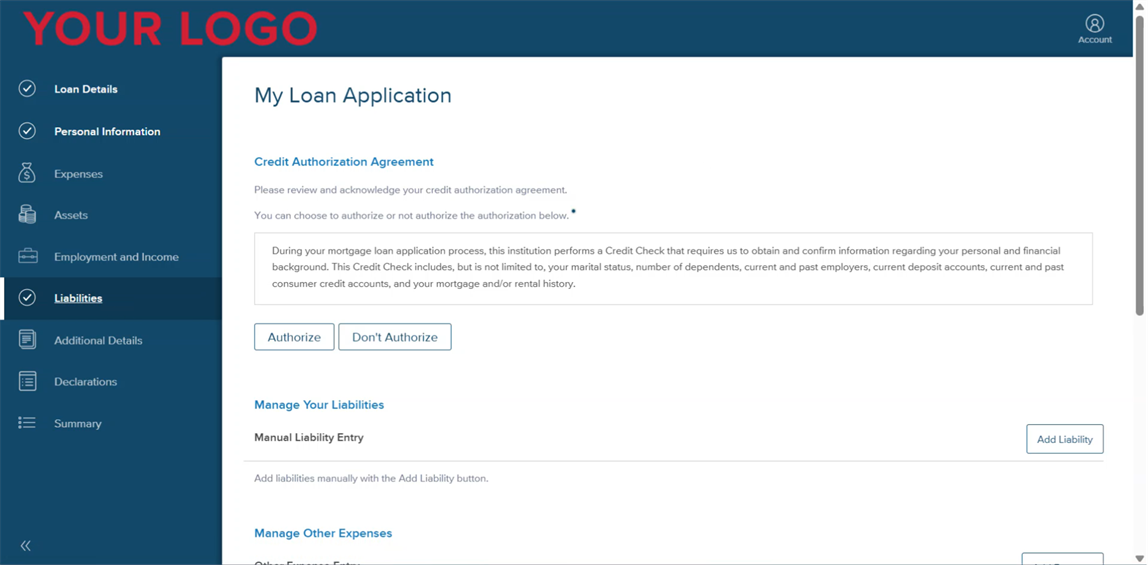
Borrower Experience
The borrower provides all content in the Liabilities section. Depending on the state of the Order Credit service toggle (YES or NO), the borrower experience differs in the following procedure, with the differences identified below with the tag Order Credit YES when your workflow Service Settings is set to YES and Order Credit NO when your workflow Service Settings is set to NO. In both cases, you must click the Credit Authorization and Credit Authorization Agreement Required toggle settings to YES.
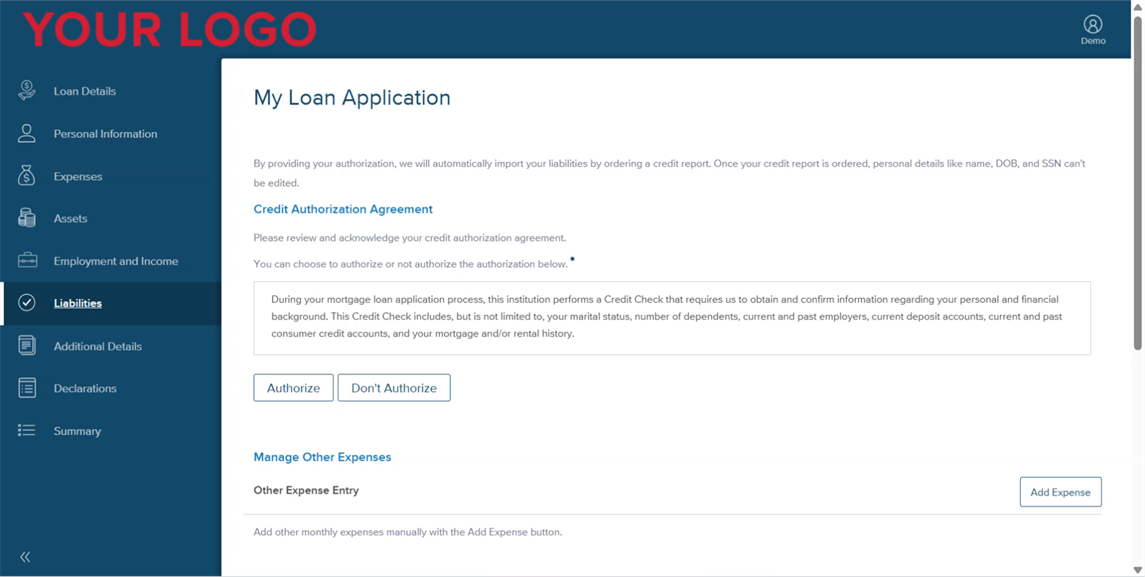
Order Credit YES
Order Credit NO
-
In the Liabilities section of the loan application, the borrower clicks Authorize.
-
Order Credit YES: If the borrower has provided the minimum required fields listed above, the Credit Order service triggers. If the borrower has not yet provided the minimum required fields, the Credit Order service does not trigger, but will trigger when the fields are provided.
-
Order Credit NO: The Credit Order service does not trigger.
-
-
The borrower continues working in the Liabilities section.
-
Order Credit YES: If needed, the borrower can manually add other expenses (if the section is not hidden under the workflow's Loan Application Sections).
If the borrower opens the Liabilities or the Summary sections prior to credit order completion, they will be notified that the credit order is still in process. If the borrower opens the Liabilities or the Summary sections after credit order completion, they will be notified of the credit order's status (Success or Fail).
-
Order Credit NO: The borrower can manually add liabilities and other expenses (if the sections are not hidden under the workflow's Loan Application Sections).
When finished in the Liabilities section, the borrower clicks Next, and continues working on the loan application.
-
-
When finished with the loan application, the borrower clicks Submit, sending the loan application to Encompass for assignment to the applicable loan officer.
-
Order Credit YES: The completed credit report and authorization are stored in the eFolder.
-
Order Credit NO: The completed credit authorization is stored in the eFolder.
-
In this section, you will enable the service that allows applicants to search and compare rates and loan programs. Prior to activating product and pricing, you must configure product and pricing on the Services Management page. For more information, see Managing Services.
To Configure the Product and Pricing Service
-
To activate product and pricing, click the Product and Pricing toggle setting to Yes. The next steps will depend on the provider configured on the Services Management page:
-
ICE Product & Pricing Engine
(Traditional Workflows) To allow applicants to run ICE PPE without requiring income on the Rates page, click the Hide all fields related to income on the Rates page toggle setting to Yes.
(Home Equity Workflows) To configure the Product and Pricing Service for a Home Equity workflow, do the following:
-
The Product and Pricing toggle setting is defaulted to Yes. On the Services Management tab (at the site level), you must select Encompass Product & Pricing Service as the provider.
If you select any provider other than Encompass Product & Pricing Service, the HELOC eligibility page on the loan application will display the lender-configured ineligible text.
-
In APR Value, select whether the lowest or highest APR will be displayed to the borrower when returned as an array of rates from the Encompass Product & Pricing Service.
-
In Max HCLTV, set the value use to be used to calculate the maximum line amount displayed to the borrower. The maximum line amount will be calculated using the estimated value returned from ICE AVM along with any outstanding mortgage balance provided by the borrower. The HCLTV value can be set based on the occupancy (Primary, Secondary, or Investment).
-
-
Optimal Blue
You must have an account with Optimal Blue and provide the following information, since Optimal Blue uses your account information to retrieve the rates and programs offered by the originator.
Status Definition Business Channel ID
The numeric value provided by Optimal Blue when you set up your account with them. Originator ID
The Originator ID to assign to the workflow. Originator First Name
First name of the originator associated with the Originator ID. Originator Last Name
Last name of the originator associated with the Originator ID. -
PollyEx - Product and Pricing Service (STG)
You must have an account with PollyEx and provide your Username, Password, and Pricing Channel, since PollyEx uses your information to retrieve the rates and programs offered by the originator.
-
-
Click Save.
In this section, you will enable the service that allows applicants to automatically send their loan applications to a Desktop Underwriting (DU) or Loan Product Advisor (LPA) underwriting service. Prior to activating Automated Underwriting, you must enable an Order Credit Service and a Product and Pricing Service, and also configure automated underwriting (DU or LPA) on the Services Management page. For more information, see Managing Services.
To Configure the Automated Underwriting Service
-
To activate Desktop Underwriting (DU) service, click the Automated Underwriting DU toggle setting to Yes.
To activate Loan Product Advisor (LPA) underwriting service, click the Automated Underwriting LPA toggle setting to Yes.
-
Click Save.
In this section, you will enable the service that allows applicants to verify their assets electronically. Encompass Consumer Connect supports Finicity and FormFree as service providers for the VOA service. Prior to activating asset verification, you must configure asset verification on the Services Management page. For more information, see Managing Services.
Administrators can enable applicants to only provide the authorization/consent for a verification of assets, employment, or income without the obligation of ordering the service and incurring costs associated with ordering the verification using the Loan App Workflows settings. Review the New Options to Allow Applicants to Authorize VOA and VOE/VOI in Specific Loan App Workflows entry in the 23.3 release notes for more information in instructions.
To Configure the Asset Verification Service
-
To activate asset verification, click the Asset Verification toggle setting to Yes. The next steps will depend on the provider configured on the Services Management page:
-
Finicity
To enable VOA with Finicity in a workflow, you must have an account with Finicity and have the User Experience ID on hand to assign to the workflow.
-
In the User Experience ID field, enter the Finicity Experience ID that you want to apply to the workflow. Experience IDs are unique identifiers provided by Finicity that references a customized user experience for both asset verification and income/employment verification. Asset verification requires its own Experience ID and Employment/Income requires its own Experience ID.

-
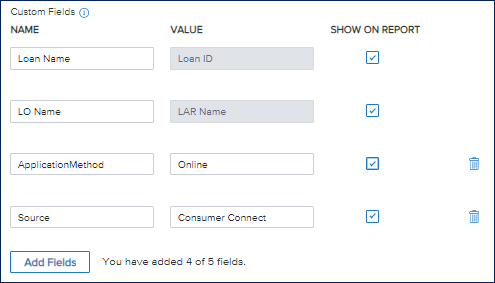
Provide any custom fields as needed. Up to five custom fields can be added to the VOA report:
-
The first two fields, Loan Name and LO Name, are added to a report by default. The Name for each of these fields can be edited, but the Value is dynamically populated from the loan application when the report is requested. Lender administrators can choose to exclude them from showing on the PDF reports by clearing Show on Report check box, however these fields will always be sent with a VOA order to Finicity.
-
The remaining three custom fields can be added by a lender administrator. These fields are static and will be sent with the VOA order exactly as they are entered here. In the example below, the lender administrator added ApplicationMethod with the value of Online and Source with a value of ECC to include in the report.
-
-
-
FormFree
To enable VOA with FormFree in a workflow, you must have an account with FormFree.
-
-
To enable applicants to review the verification authorization and provide consent to perform the verification of assets, set the Asset Verification Authorization toggle to Yes. Applicants will be able to provide the authorization/consent for a verification of asset without the obligation of ordering the service and incurring costs associated with ordering the verification.
-
To require applicants to accept the asset authorization agreement in order to continue with the loan application, set the VOA Authorization Agreement Required toggle to Yes.
-
Review the Asset Verification text and update as needed.
-
Click Save.
In this section, you will enable the service that sends incomplete or abandoned applications containing a first name, last name, and at least one type of contact information (for example, phone number, email address, or home address) to Velocify to flag for immediate follow-up. To link Velocify to Encompass Consumer Connect, you must provide your Velocify Client ID and Lead Source ID.
About the Velocify Lead Source ID
The Velocify Lead Source ID is the Campaign ID. The Campaign ID is located in the campaign's posting URL, also known as the "Velocify URL". This URL points to the location of the campaign and specifies the Campaign ID. In the following Velocify URL example, you can see the Campaign ID is 10.
https://secure.velocify.com/Import.aspx?Provider=EncompassConsumerConnect&Client=DatabaseName&CampaignId=10&XmlResponse=true
To learn how to generate the Velocify URL, see How to Add a Campaign in the Velocify online help. For information about setting up a Velocify account, contact your ICE Mortgage Technology representative.
To Configure the Velocify Integration Service
-
To activate Velocify integration, click the Velocify Integration toggle setting to Yes.
-
In the Velocify Lead Source ID field, enter the Lead Source ID you want to associate with this workflow.
-
Click Save.
It can take an hour or so after you enable the service before data can be seen in the Velocify campaign. Data is synchronized every hour and can take 20 minutes to complete.
To Test the Velocify Integration
To test your Velocify integration, start a new loan application and provide a first name, last name, and a phone number (or any other type of contact information), then save the application. The data you provided in the loan application will appear in your Velocify campaign after synchronization is complete.
In this section, you will enable the service that allows applicants to order a verification of employment and income. Encompass Consumer Connect supports Finicity and The Work Number as service providers for the VOE/VOI service. Prior to activating VOE/VOI, you must configure VOE/VOI on the Services Management page. For more information, see Managing Services.
To Configure the VOE/VOI Service
-
To activate VOE/VOI, click the VOE/VOI toggle setting to Yes. The next steps will depend on the provider configured on the Services Management page:
-
Finicity
To enable VOE/VOI with Finicity in a workflow, you must have an account with Finicity and have the User Experience ID on hand to assign to the workflow.
-
In the User Experience ID field, enter the Finicity Experience ID that you want to apply to the workflow.
An Experience ID is a unique identifier provided by Finicity that references a customized user experience for both asset verification and employment/income verification.
-
Provide any custom fields as needed. Up to five custom fields can be added to the VOE report:
-
The first two fields, Loan Name and LO Name, are added to a report by default. The Name for each of these fields can be edited, but the Value is dynamically populated from the loan application when the report is requested. Lender administrators can choose to exclude them from showing on the PDF reports by clearing Show on Report check box, however these fields will always be sent with a VOE order to Finicity.
-
The remaining three custom fields can be added by a lender administrator. These fields are static and will be sent with the VOE/I order exactly as they are entered here. In the example below, the lender administrator added ApplicationMethod with the value of Online and Source with a value of ECC to include in the report.
-
-
-
The Work Number
To enable VOE/VOI with The Work Number in a workflow, you must have an account with The Work Number.
-
-
To enable applicants to review the verification authorization and provide consent to perform the verification employment and income, set the VOE/VOI Verification Authorization toggle to Yes. Applicants will be able to provide the authorization/consent for a VOE/VOI without the obligation of ordering the service and incurring costs associated with ordering the verification.
This authorization toggle is set to Yes automatically (and cannot be switched) when the VOE/VOI services toggle is set to Yes. If the VOE/VOI services toggle is set to No, you may switch the VOE/VOI Authorization toggle to Yes or No.
-
To require applicants to accept the authorization agreement in order to continue with the loan application, set the VOE/VOI Authorization Agreement Required toggle to Yes.
-
Review the VOE/VOI agreement text and update as needed.
-
Click Save.