New Features & Forms for 20.1 July Service Pack

Encompass LO Connect Support for URLA 2020
New pages have been added to Encompass LO Connect to enable loan officers to enter information for loans using the new URLA 2020 output forms. These forms are currently scheduled for submission to GSE-specific AUS production environments starting January 1, 2021, with a mandatory usage date of March 1, 2021.
The updates include new pages for entering information for the URLA 2020 version of the 1003 URLA application output form plus new pages for entering verification records for URLA 2020 loans. The user interface for accessing and navigating between the pages has also been updated to enable user to switch between the 2009 or 2020 versions of the URLA forms.
The new URLA 2020 enhancements are available in desktop form factor. For accessing via tablet, we recommend using the landscape orientation. Support for URLA 2020 in the mobile form factor will be available in a future version of Encompass LO Connect.
An Encompass LO Connect user can access the new URLA 2020 pages if the user has been assigned a persona with the Change RESPA-TILA Form Version option selected in the Personas setting in Encompass (Encompass Settings > Company/User Setup > Personas > Loan tab > Other section).
To Enable the URLA 2020 Pages:
-
From the Pipeline, select a loan.
-
The Loan Application view displays.
-
-
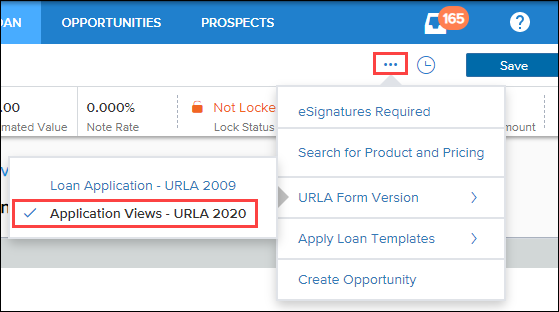
To change the URLA version, select the ellipsis icon (three dots
 ) to the left of the Save button, select URLA Form Version, and then select Application Views – URLA 2020.
When working with the URLA 2009 application forms only seven cards (buttons) display in the right panel, and the application pages display as Loan Application in the Forms list in the left navigation panel.


After switching to the URLA 2020, application pages display as Application View in the Forms list in the left navigation pane, and (New URLA) displays after the Forms label.

When using the URLA 2020, a Verifications option also display in the Forms drop-down in the left navigation panel.

These onscreen elements indicate the URLA version currently used by the loan and remain visible even when the user navigates away from the URLA pages, for example, when working on the Fee Itemization page.
When you convert an Incomplete Application from the Prospects tab, the loan is added to the Pipeline as an URLA 2009 loan.
ENCW-47809
Application View
The Application View page displays a series of 17 cards that are available for accessing data entry pages for different sections of the URLA 2020 form. Select a card to navigate to a data entry page.

The table below lists the Application View card names and shows the mapping to the corresponding Encompass input form. For additional information about the pages accessed via the cards, refer to the following sections in these release notes.
| Application View Card | Encompass Input form |
|---|---|
| Borrower Information |
1003 URLA Part 1 Borrower Summary - Origination |
| Credit Information & Ordering |
1003 URLA Part 1 Borrower Summary- Origination |
| Property, Title & Trust Information |
1003 URLA Part 4 1003 URLA Lender |
| Loan Information |
1003 URLA Lender |
| Rate & Registration Information | Borrower Summary - Origination |
| Employment & Income | 1003 URLA Part 2 |
| Assets , Other Assets, Gifts & Grants |
1003 URLA Part 3 1003 URLA Part 4 |
| Liabilities |
1003 URLA Part 3 1003 URLA Part 4 Borrower Summary - Origination |
| Financial Information – Real Estate | 1003 URLA Part 3 |
| Qualifying the Borrower | 1003 URLA Lender |
| Declarations | 1003 URLA Part 4 - Section 5 |
| Demographics Information | 1003 URLA Part 4 - Section 8 |
| Homeownership Education & Housing Counseling | 1003 URLA Lender |
| Military Service & Language Preference | 1003 URLA Part 1 |
| Acknowledgments & Agreements | 1003 URLA Part 4 - Section 6 |
| Loan Originator Information | 1003 URLA Part 4 |
| Continuation Information | 1003 URLA Continuation |
To Open the Application View Page:
-
From the Pipeline, select a loan.
-
When the loan opens, the Application View page displays.
-
To view a form, select a card, such as Borrower Information.
-
To select a different page to view, select the Application View entry in the left panel, or select the Blue Arrow
 at the top-right of the right panel.
Your Encompass administrator controls the cards that are visible on the Application View page for each Encompass LO Connect persona. Access to the card is configured by selecting or clearing the Input Forms options in the Personas setting in Encompass (Encompass Settings > Company/User Setup > Personas > Forms/Tools tab > Input Forms section). The following table maps the Personas setting form options to the Application View cards.
| Encompass Form | Application View Card |
|---|---|
| 1003 URLA Part 1 |
Borrower Information Credit Information & Ordering Military Service & Language Preference |
| 1003 URLA Part 2 |
Employment & Income |
| 1003 URLA Part 3 |
Assets, Other Assets, Gifts & Grants Liabilities Financial Information |
| 1003 URLA Part 4 |
Property, Title & Trust Information Assets, Other Assets, Gifts & Grants Liabilities Declarations Demographics Information Acknowledgments & Agreements Loan Originator Information |
| 1003 URLA Lender |
Property, Title &Trust Information Loan Information Qualifying the Borrower Homeownership Education & Housing Counseling |
| 1003 URLA Continuation | Continuation Information |
| Borrower Summary Origination |
Borrower Information Credit Information & Ordering Rate & Registration Information Liabilities |
If access to an Encompass form is removed, not all the corresponding Application View cards will be hidden. In some cases, the card will still be visible, but when you open the page, some of the fields will be disabled. For example, if the user’s persona does not have access to the 1003 URLA Lender form, the cards for Loan Information, Qualifying the Borrower, and Homeownership Education & Housing Counseling will be hidden. However, the Property, Title & Trust Information card will still be visible because this page also contains 1003 URLA Part 4 fields. When the user opens the Property, Title & Trust Information page, the Property Type & Title and Trust Information fields are disabled but the Subject Property Information fields from 1003 URLA Part 4 are enabled because the user has access to those fields.
ENCW-46266
Use the Borrower Information page to configure the print options for the URLA 2020 output form and to enter basic information, addresses, and credit information for the borrower and co-borrower.
Borrower Information Section
To be completed by Lender
Use the two print check boxes in the To be completed by the Lender section to configure the URLA Loan Identifier that prints on the output form. The URLA Loan Identifier displays on the following line and populates on the URLA 2020 output form. By default, this field is populated with the Encompass Loan Number. Only one of the check boxes can be selected at a time.

-
Select the Print ULI on URLA check box to populate the output form with the universal loan identifier (ULI) generated by Encompass.
-
Select the Print both ULI/NULI and Loan # check box to populate the output form with an identifier that combines the loan number and the universal loan identifier (ULI). If the loan is reported as Partial Exempt from HMDA reporting, the non-universal loan identifier (NULI) replaces the ULI as a component in the combined identifier. A change made to the ULI or loan number for a loan will trigger a change in the loan identifier used on the output form.
Select the Include Lender Pages in Borrower Package check box to include the 1003 URLA – Lender pages in the packages sent to borrowers.
In the fields at the bottom of the To be completed by the Lender section, select a Loan Program by using the Find icon, and then enter the Agency Case # and Lender Case# for the loan. The Agency Case No and Lender Loan Number (or ULI) print at the top of the URLA 2020 output forms.
Entering Basic Information for the Borrower and Co-Borrower
In the remainder of the Borrower Information section, use the Borrower and Co-Borrower columns to enter basic information for the selected borrower and co-borrower, including each borrower’s name, Social Security Number, date of birth, citizenship status, marital status, dependents, and contact information. The following sections describe data entry that is new or updated for the URLA 2020 pages.
No Co-applicant
When a loan has no co-borrower, select the No Co-applicant check box at the top of the Co-Borrower column.

Additional borrower (Joint) Format
When a loan has a co-borrower, the borrower and co-borrower might receive borrower information that is formatted differently. This is determined by the selection made for the Use Additional borrower (Joint) Format check box.

When the check box is cleared:
-
The borrower receives sections 1-8 of the URLA output form containing details of the borrower’s personal income, assets, and liabilities as well as details about joint assets and liabilities shared by both the borrower and co-borrower.
-
The co-borrower receives sections 1-8 of the URLA output form containing details of the co-borrower’s personal income, assets, and liabilities as well as details about joint assets and liabilities shared by both the borrower and co-borrower.
When the check box is selected:
-
The borrower receives sections 1-8 of the URLA output form containing details of the borrower’s personal income, assets, and liabilities as well as details about joint assets and liabilities shared by both the borrower and co-borrower.
-
The co-borrower receives sections 1-8 of the URLA output form containing details of the co-borrower’s personal income, assets, and liabilities, but the co-borrower does not receive detailed information about joint assets and liabilities. Instead, sections 2, 3 and 4 direct the co-borrower to the borrower’s copy of the output form for detailed information about joint assets and liabilities in the applicable sections, as shown below.

Alternate Names
Select the Edit icon for the borrower or co-borrower Alternate Names field to open a pop-up window where you can enter alternate names that display on the Borrower Information – Vesting page.
To Add an Alternate Name:
-
Select the Edit icon next to the Alternate Names fields to open the Alternate Names pop-up window for the borrower or co-borrower.

-
Select the Add icon on the Full Name line.
-
Type a First Name, Middle Name, Last Name, and Suffix if applicable, and then select OK.
Adding one or more items to the pop-up will populate the information into the Alternate Name fields for the borrower or co-borrower on the Borrower Information screen.
Citizenship
Use the Citizenship check boxes to indicate whether the borrower or co-borrower is a U.S. Citizen, Permanent Resident Alien, or Non-Permanent Resident Alien. If you select Non-Permanent Resident Alien, a field for the Country of Citizenship displays so you can enter that information for the borrower.

Borrower Count
Two fields are used to capture the borrower count on a loan. The Borrower Count is a calculated field populated with the total number of borrowers across all borrower pairs for the loan file. The Expected Borrower Count field is used with loans that are imported from Encompass Consumer Connect. These applications have a maximum of two borrowers listed on the application, so the loan officer can use the Expected Borrower Count field to enter the total number of borrowers who are expected to be on the loan.
Marital Status
Use the Marital Status drop-down list to describe the borrower’s marital or relationship status. When Unmarried is selected in the Marital Status section and Yes is selected to indicate that the borrower has joint property rights with another individual, the information entered in this section is populated to the Unmarried Addendum output form, which is generated along with the URLA output form. The Unmarried Addendum is not generated when Unmarried is selected but the indicator for joint property rights is blank or is populated with No.
The information in the addendum is used to determine how state property laws affecting creditworthiness (directly or indirectly) apply to the borrower, including ensuring clear title. For example, the lender can use the Unmarried Addendum when the borrower resides in any state, the District of Columbia, the Commonwealth of Puerto Rico, or any other territory or possession of the United States that recognizes civil unions, domestic partnerships, or registered reciprocal beneficiary relationships or when the subject property is in one of these. Note that while the Unmarried Addendum is available in the Print menu, if the above conditions are not met, the user will receive a blank form when they print it.
To Complete the Marital Status Section:
-
Select the Married, Separated, or Unmarried check box.
-
Select Yes or No from the drop-down list to indicate whether there is a person who is not the borrower’s legal spouse, but who has real property rights similar to those of a legal spouse.
-
If you select Yes, select an option from the Domestic Relationship Type drop-down list to describe the relationship.
-
If you select Other for the relationship type, enter a description in the Other Domestic Relationship Type field.
-
In the State field, type the two-letter abbreviation for the state or territory where the relationship was formed. Example: MI or OK.
If the Marital Status is changed from Unmarried to Married, Encompass clears all the fields below the Unmarried check box and above the two Dependents fields.
Dependents
In the Dependents sections, enter the number and age of dependents.
Contacts
In the Contacts sections, enter the enter contact phone numbers and email addresses for the borrower and co-borrower. Selecting the Copy from Borrower button in the Current Address section also copies the borrower contact information to the co-borrower fields in this section.
Current/ Former/ Mailing Address
Use this section to enter the Current Address, Former Address, and Mailing Address for the borrowers.
Current Address and Former Address
The information that displays in the Current Address and Former Address sections is linked to the Residence verification page. Data entered or updated on one page is copied to the other.
- The Current Address section displays the first Current address listed in the Residence verification page.
- The Former Address section displays the first Prior address listed in the Residence verification page.
These sections iterate on the printed output form. All Residence verification records entered for either Current or Former addresses will print to the output form.
The Current Address and Former Address sections contain new Housing sections that capture the borrower and co-borrower current and former housing situations. Each of these sections includes the following fields:
-
No Primary Housing Expense check box for borrower and co-borrower current and former addresses.
-
Monthly rental amount for borrower and co-borrower current and former addresses.
Additionally, an Edit icon in the Housing section for the Current Address enables loan offices and processors to view present and proposed housing expenses for the loan.
Copy from Borrower Buttons
Select the Copy from Borrower button in the Current Address, Present Address, or Mailing Address sections to copy the address fields from the borrower column to the co-borrower column for that section. The button in the Current Address section also copies the contact information fields to the co-borrower contact information fields but does not copy information from any fields above the Contact Information section. Select the Copy from Borrower button in the Current Address or Present Address sections will create a new Residence verification entry for the co-borrower if one did not already exist.
Mailing Address
In the Mailing Address section, enter the mailing address for the borrowers or select the Same as Current check boxes to populate the fields with the current address for the borrower or co-borrower.
This section includes the same Credit Information content and credit ordering functionality that is available on the Borrower Summary – Origination and Borrower- Summary Processing pages.
Credit Information & Ordering
This page includes the same Credit Information content and credit ordering functionality that is available on the Borrower Summary – Origination and Borrower- Summary Processing pages as well as basic borrower information and the borrower’s current address, which uses fields that are also available on the Borrower Information page.
Us the Property, Title & Trust page to enter information about the subject property, title, and trust.
Subject Property Information
Use the Subject Property section to enter loan and property information, including the property address, property type, project design type, estimated and appraised value, legal description, occupancy status, community property and energy improvement information and check boxes to indicate a mixed-use property and manufactured home.
Subject Property Occupancy
For most loan scenarios only the first three check boxes are enabled for Subject Property Occupancy Status and only one check box can be selected at a time. The FHA Secondary Residence check box is typically disabled and cannot be selected. However, the FHA Secondary Residence program allows qualified FHA borrowers to purchase a second home closer to their place of employment. If the Second Home check box is selected for the Subject Property Occupancy Status and the loan type is FHA, then the FHA Secondary Residence check box is also enabled and can be selected along with the Second Home check box. Not all FHA loans for second homes qualify for the FHA Secondary Residence program, so this check box is not selected by default and must be manually selected when applicable.
The URLA 2020 output form has four radio buttons for the Occupancy type: Primary Residence, Second Home, Investment Property, and FHA Secondary Residence. Only one of these radio buttons selected for a loan on the output form. When both the Second Home and FHA Secondary Residence check boxes are selected on the Property, Trust & Title page, only FHA Secondary Residence is selected on the output form.
Title and Trust Information
The information in the title and Trust Information is used to populate the L2. Title Information section on the URLA 2020 output form. Vesting defaults to the identified borrowers on the loan and includes all borrower pairs. The final version of the URLA printed in the closing package will be updated based on the final documented vesting in the Borrower Summary – Vesting page.
Use the Loan Information page to configure how the URLA output form is printed, enter loan information, and edit and view the proposed monthly payment amounts for the loan.
To be completed by the Lender
The To be completed by the Lender section contains the same information that displays at the top of the Borrow Information page. Use the two print check boxes in the To be completed by the Lender section to configure the URLA Loan Identifier that prints on the output form. The URLA Loan Identifier displays on the following line and populates on the URLA 2020 output form. By default, this field is populated with the Encompass Loan Number. Only one of the check boxes can be selected at a time.

-
Select the Print ULI on URLA check box to populate the output form with the universal loan identifier (ULI) generated by Encompass.
-
Select the Print both ULI/NULI and Loan # check box to populate the output form with an identifier that combines the loan number and the universal loan identifier (ULI). If the loan is reported as Partial Exempt from HMDA reporting, the non-universal loan identifier (NULI) replaces the ULI as a component in the combined identifier. A change made to the ULI or loan number for a loan will trigger a change in the loan identifier used on the output form.
Select the Include Lender Pages in Borrower Package check box to include the 1003 URLA – Lender pages in the packages sent to borrowers.
Select a Loan Program by using the Find icon, and then enter the Agency Case # and Lender Case# for the loan. The Agency Case No and Lender Loan Number (or ULI) print at the top of the URLA 2020 output forms.
Loan Information
The Loan Information section is used to populate the L1. Property and Loan Information section on the URLA 2020 output form. Review this section and complete any information that is missing. Additional fields have been included in this section for the purposes of ordering AUS (refinance detail, construction loan details). These fields work in the same manner as they do in other screens but are included on the Loan Information page for your convenience.
Transaction Detail
When Construction is selected for Loan Purpose, the Construction-Conversion/Construction-to-Permanent, Single Closing, and Two Closing check boxes in the Transaction Detail section are disabled for editing.
When the Construction - Perm check box is selected for Purpose of Loan, the Construction to Perm Disclosure Separately and Construction-Conversion/Construction-to-Permanent check boxes in the Transaction Detail section are disabled for editing.
Refinance Information
This section is disabled for editing when the Purchase or Other option is selected for the Loan Purpose
Mortgage Loan Information
The information in the Mortgage Loan Information section is used to populate the L3. Mortgage Loan Information section on the URLA 2020 output form. Most of the information on the page is populated from other pages in Encompass LO Connect. In the Amortization Type and Loan Features sections, quick entry pop-up windows have been included for convenience in viewing related data for special features.
Amortization Type - ARM Loans
If Adjustable Rate is selected for the Amortization Type, additional fields display below the check box.

Select the Find icon to select a preconfigured ARM Type and select the Edit icon to enter or edit ARM information.

Loan Features
This section provides check boxes to indicate additional features that will be disclosed. Quick-access pop-up windows have been provided for features that require supporting data. This data can be configured in templates or business rules and will behave the same as the prior version of the application (URLA 2009) if the lender originates loans with these features. The Payment Deferral for the First Five Years and Affordable Loan check boxes are used only with AUS and do not affect Encompass calculations.

Proposed Monthly Payment for Property
The Proposed Monthly Payment for Property section includes the same quick entry pop-up windows used on the URLA 2009 pages for generating estimates for each component of the monthly payment.
The Rate Information section includes the same rate-related information and functionality that display in the Transaction Details section of the Borrower Summary – Origination page.

The Registration Information section includes the same registration information and functionality that displays on the Registration section of the Borrower Summary – Origination page, plus two additional fields for the Investor Loan Number and the Investor Commitment Number.

The Employment & Income page captures all required borrower income, including employment, self-employment, and other income, enabling the lender to underwrite the loan to GSE guidelines. One of the bigger changes with the URLA 2020 involves the way that income and employment records are captured. The input pages used for the URLA 2009 version had one set of fields for current employment. The Employment & Income page for URLA 2020 loans can capture multiple current employment records. Income details, including details of any associated military pay or entitlements, is included as part of each employment record.
The first three employment and income sections on the Employment & Income page are tied to entries in the Employment verification page. Select the Manage VOE button at the top of each section to open the Employment verification page to create or view Employment verification records. The last section on the Employment & Income page is tied to the Other Income page. All records entered in the Employment verification page and the Other Income verification page will print on the URLA 2020 output form. All employment income identified as Current will be summed and included in the existing aggregate income fields.
Current and Additional Employment
The Current Employment/ Self Employment and Income and Additional Employment / Self Employment and Income sections capture employment and income that currently applies to the borrower and co-borrower. This information is used to populate sections 1b and 1c on the URLA 2020 output form. If more than two current employment records are entered for any borrower, the output form will expand to show the additional entries.
The Current Employment/ Self Employment and Income section includes the first entry on the Verification of Employment (VOE) page marked as Current for the borrower or co-borrower. If there is no Current VOE entry for the borrower or co-borrower, this section is blank. The Does Not Apply check box is cleared by default and must be manually selected to exclude the record from the output form for a borrower or co-borrower. If data is entered in this section prior to selecting the Does Not Apply check box, the data is retained, but the section will not print on the URLA 2020 output form.
The Additional Employment / Self Employment and Income section displays the second record in the VOE that is marked as Current for the borrower or co-borrower. When there is no second current VOE for the borrower or co-borrower, this section is blank. If there are multiple current VOEs for the borrower or co-borrower, this section will repeat on the printed (or electronically generated) URLA to show all the additional records in VOE positions. The Does Not Apply check box is cleared by default and must be manually selected if you want to exclude the record from the output form for a borrower or co-borrower. If data is entered in this section prior to selecting the Does Not Apply check box, the data is retained, but the section will not print on the 2020 URLA output form.
Self Employed Borrowers
For a borrower who is self-employed or a business owner, the self-employed income amount is captured along with information about the borrower’s business. The underwriter conducts a self-employment income analysis and documents the amount in the Base income amount in the VOE associated with the self-employment. If additional records exist, they are documented in separate entries.

Pop-Up Windows for Base Pay and Military Entitlements
In the Gross Monthly Income section for Current Employment/ Self Employment and Income or Additional Employment / Self Employment and Income, select the Edit icon next to the Base income field for the borrower or co-borrower to open a Base Income Calculation pop-up window to calculate the monthly income based on the payment frequency. The pop-up is also accessible from the Employment verification page. This calculator allows the loan officer to calculate the monthly income amount for the borrower if they are paid on a different frequency.

Military entitlements are captured as part of an Employment verification record. Select the Edit icon next to the fields to open a Calculate Military Entitlements pop-up window that enables detailed entry of military pay information. The pop-up is also accessible from the Employment page. The pop-up window enables lenders to enter various individual military pay and allowance amounts from the borrower’s pay statement. These amounts are then populated correctly to the Base, Military Entitlements, Others, and Total amounts on the appropriate Gross Monthly income section for Current Employment/ Self Employment and Income or for Additional Employment / Self Employment and Income.
Previous Employment / Self Employment Income
The Previous Employment / Self Employment Income section is used to provide previous employment information if the current employment record does not cover at least two years. This information is printed in section 1d of the URLA 2020 output form. The Previous Employment / Self Employment Income section displays the data captured in the first Employment verification entry that is marked as Prior for the borrower or co-borrower. If there is no prior Employment verification for the borrower or co-borrower, this section is blank. If there are multiple prior Employment verifications for the borrower or co-borrower, this section will repeat on the printed (or electronically generated) URLA. Select the Show all VOE button to open the Employment verification page.
The Does Not Apply check box is cleared by default and must be manually selected to exclude the other income records from the URLA 2020 output form for a borrower or co-borrower. When data is entered in a section, the Does Not Apply check box is cleared and disabled for the section and remains disabled until all data is cleared from the section.
Income from Other Sources
The Income from Other Sources section enables entry of other income sources for the borrower pair, which includes everything not related to employment or rental income, including dividends and interest income. This information is populated to section 1e of the URLA 2020 output form. Select the Add button below the income entries or select the Manage Other Incomes button on the upper right to open the Other Income page, where you can create other income records. As you add entries, they display in the Income from Other Sources section. Select the Remove button to delete an entry.
The Does Not Apply check box is cleared by default and must be manually selected to exclude the other income records from the URLA 2020 output form for a borrower or co-borrower. When the Does Not Apply check box is selected, the data entered in this section is retained, but the information will not print on the URLA 2020 output form.
The Total Other Monthly Incomes, Total Borrower Other Monthly Incomes, and Co-Borrower Other Incomes display at the bottom of the Income from Other Sources section. The combined borrower and co-borrower total displays in the Total Other Income Amount.
Aggregate Income Values
Income is entered in multiple Employment verification records and Other Income verification records. The total for all current employment income and all other income records is automatically calculated and prints in the aggregate income fields for the borrower and co-borrower on other forms.
Use the Assets, Gifts & Grants page to capture the various types of assets, gifts, and grants the borrower is using for the loan.
Assets - Bank Accounts, Retirement and Other Accounts
Use the Assets - Bank Accounts, Retirement and Other Accounts section to enter all deposit accounts owned by the borrower and co-borrower related to banking and retirement planning that need to be considered in underwriting the loan. To create additional entries for these types of assets, select the Add button or select the Manage VOD button to open the Verification of Deposit page. Select the Remove button to delete an entry. The Total Asset Amount, Borrower Total, and Co-Borrower Total for these assets display below the entries.
Other Assets
Use the Other Assets section to capture other borrower and co-borrower assets that are outside the traditional account deposit structure, allowing the lender to identify the cash or market value of assets or asset accounts beyond the bank and retirement accounts captured in the Assets - Bank Accounts, Retirement and Other Accounts section. To create additional entries for these types of assets, select the Add button or select the Manage Other Assets button to open the Verification of Other Assets page. Select the Remove button to delete an entry. The Total Asset Amount, Borrower Total, and Co-Borrower Total for these assets display below the entries.
An Earnest Money Cash Deposit in this section will affect the Cash to Close. Earnest money is still reflected on Qualifying the Borrower page.
Gifts or Grants You Have Been Given or Will Receive for this Loan
Use the Gifts or Grants You Have Been Given or Will Receive for this Loan section to capture gifts or grants the borrower, co-borrower, or both are using for the loan. To create additional entries for gifts and grants for the loan, select the Add button or select the Manage Gifts or Grants button to open the Verification of Gifts and Grants page. Select the Remove button to delete an entry. The Total Of Gifts and Grants displays below the entries. Enter comments regarding the gifts and grants in the Comments text box.
Use the Liabilities page to review credit information and capture the various types of liabilities associated with the borrower and co-borrower for loan.
Credit Information
The Credit Information section includes the name, social security number, date of birth, and the current address for the borrower and co-borrower, plus the same credit information and credit ordering functionality that is available on the Borrower Summary – Origination and Borrower Summary – Processing pages. A Manage VOL button is also provided here for access to the Verification of Liabilities page.
Credit Cards, Other Debts and Leases
The Credit Cards, Other Debts and Leases section maps all the liabilities from the credit report except for mortgages and HELOCs, which are excluded from the calculations populated to the output form for liabilities. To create additional entries, select the Add button or select the Manage VOL button to open the Verification of Liabilities page. Select the Remove button to delete an entry. The Total Liabilities amount for this section displays below the entries.
Other Liabilities and Expenses
Use the Other Liabilities and Expenses section to capture liabilities from either the credit report or borrower disclosures that are not related to the items covered in the Credit Cards, Other Debts and Leases section or on the Financial Information – Real Estate page. Examples include alimony, child support, separate maintenance, and job-related expenses. To create additional entries, select the Add button or select the Manage VOOL button to open the Verification of Other Liabilities page. Select the Remove button to delete an entry. The Total Liabilities, Borrower Total, and Co-Borrower Total display below the entries.
Other New Mortgage Loans on the Property You are Buying or Refinancing
This section displays additional new mortgage loans on the subject property aside from existing loan, for example down payment assistance loans or standalone piggyback loans closed with the current loan by either you or another lender. To create additional entries, select the Add button or select the Manage VOAL button to open the Verification of Additional Loans page. Select the Remove button to delete an entry. The Total Additional Loan Amount and Total Applied to Down Payment display below the entries.
Existing liens to be retained are captured in the liabilities.
Use the Financial Information – Real Estate page to enter information about properties owned by the borrower, co-borrower, or both. This information is populated in section 3 on the URLA 2020 output form.
Property You Own
Select the Does not apply to check box for the Borrower or Co-Borrower to collapse the Section 3: Financial Information Real Estate section for the borrower or co-borrower on the URLA output form. Select the Does not apply check box in the Mortgage Loans on this Property sections when a property is owned free and clear to collapse the Mortgage Loans on this Property section for the property on the output form.
To create entries for mortgage properties, select the Add button at the bottom of the page or select the Manage VOM button to open the Mortgage verification page. Select the Remove button to delete a property. The order in which the properties are listed on the Financial Information - Real Estate page matches the order in which the properties display on the Mortgage verification page. When the Subject Property check box is selected for a property, the subject property moves to the top of the list on the Financial Information – Real Estate page and the Mortgage verification page. Changing the order of the properties on one page also changes the order of the properties on the other page.
The Qualifying the Borrower page displays the amounts and the calculations used to determine the cash due from or to the borrower for the loan.
Due from Borrowers(s)
The Due From Borrower(s) section at the top of the Qualify the Borrower page replaces the Details of Transaction section on the URLA 2009 loans. With URLA 2020 loans purchase payoffs (payoffs executed as part of a purchase transaction) are recorded on the application. Payoffs not associated with the subject property are now populated in the Qualifying the Borrower section and are factored into the Cash to Close amount for either a refinance of a purchase.
Total Mortgage Loans
The Total Mortgage Loans section includes the Base Loan Amount (excluding financed MI) and the total Applied to Down Payment from Verification of Additional Loans. The Other New Mortgage Loans on line J includes the total of all the Amount Applied to Down Payment fields entered across all the records in the Additional Loans verification page.
Total Credits
The Seller Credits section includes the Seller credit amounts populated from the Fee Itemization page. The Other Credits section includes calculated amounts for the Total Closing Costs Paid by Lender and Other, Total of Gifts and Grants, and Total of Other Assets Applied to the Loan (Total Earnest Money Cash Deposits excluding other ‘Other Assets’). Use lines M3-M6 to select any other credits (except for Earnest Money) that are being applied as appropriate for the loan scenario per your company’s credit policy and guidelines.
This page captures all relevant declarations from both the borrower and co-borrower that are populated to section 5 on the URLA 2020 output form.
To Complete the About This Property and Your Money for this Loan Section:
-
Use the drop-down lists to select Yes or No options for each declaration.
-
When Yes is selected, an Add Explanation link displays below the drop-down list.
-
Select the link to open a pop-up window where you can add an explanation for each answer. For each borrower pair, one explanation window is provided per declaration. If Yes is selected for both the borrower and co-borrower, use the explanation field to provide information about both the borrower and co-borrower if needed.
After adding an explanation, the label for the link changes to Edit Explanation.
-
Select the check box to control whether the explanation prints on the Continuation Page through data entry, business rules, or Dynamic Data Management triggers.
-
Business rules or Dynamic Data Management (DDM) rules can be set up to configure header text for explanation box when the text is included in the 2020 version of the URLA Continuation Page output form.
To Complete the About You Finances Section:
-
For declaration M, if a borrower has declared bankruptcy within the past seven years, the check boxes listing the bankruptcy chapters are enable for selection. Multiple chapters can be selected at the same time. This data is provided to the AUS system.
-
For declarations H, K, L, and M, select the Edit icon to open a pop-up window where you can select DU codes for confirmed inaccuracies in credit report data for Foreclosure, Deed in Lieu, Short Sales, Delinquency, or Bankruptcy as well as codes for extenuating circumstances. These codes pass to DU and are used to override negative credit information that has been verified as inaccurate.
The Demographics section enables the entry of demographic information for the borrower and co-borrower for HMDA reporting purposes.
Select Yesthe or No check box to indicate whether the Borrower(s) has completed homeownership education (group or web-based classes) within the last 12 months. If you select the Yes check box, select the format used for the most recently classes and enter information about the provider and the completion date.
Use the Military Service section has been added to capture details of military service for the borrower, co-borrower, or their spouses on the URLA 2020 forms. This information will print in Section 1a of the Business Information or Additional Borrower forms.
-
When the No check box is selected, the remaining check boxes in this section are disabled except for the Surviving spouse check box.
-
When the Yes check box is selected, all four subordinate check boxes are enabled. More than one of these check boxes can be selected at the same time.
If the Expiration Date of Service Tour is not known, which is reflected by 88888 on the service member’s pay statement, the expiration date should not be entered.
Use the Language Preference section to select a check box to indicate the language in which they prefer to do business. If the Other check box is selected, the description field is enabled and can be edited. This information will print in Section 1a of the Borrower Information and Additional Borrower Information output forms.
This section is for information purposes. Encompass does not support documents in languages other than English, Fannie Mae has prepared and made available a Spanish translation guide that can be provided to Spanish speaking borrowers to assist them with completing the English version of the URLA. Review your company policies and determine how your company will deal with this information regarding communications and processes with customers with limited English proficiency who request a specific language other than English.
This page displays the application date and provides a link to a pop-up window with the Acknowledgments and Agreements language used on the output form. Select the link to review the language. Borrowers sign the acknowledgments and agreements electronically or via wet signing when disclosures are sent.
The Loan Originator Information page captures loan originator information. Complete any sections of the page that are not already populated from loan data templates or other input pages.

Use the Continuation Information page to enter additional information for the borrower or co-borrower that displays on the Universal Residential Loan – Continuation Sheet output form. The Continuation Sheet is included when you generate an URLA 2020 output form with one or more of the following conditions:
- There is a balloon payment on the loan
-
The Subject Property state (field ID 14) is CA, MA, or SC.
-
Descriptions have been entered on the Continuation Information page
-
Descriptions have been entered and the Print explanation on URLA check box is selected in one or more Add Explanation pop-up boxes on the Declarations page.
Under URLA 2020, the following information displays on the URLA Continuation output form in the order shown below:
-
Balloon payment information, if applicable.
-
State Specific required language when the Subject Property state (field IS 14) is CA, MA, or SC.
-
Borrower Additional Information:
-
Descriptions entered on the Continuation Information page.
-
Descriptions entered in the Add Explanation pop-up boxes on the Declarations page (when the Print explanation on URLA check box is selected in the Add Explanation pop-up window).
-
-
Co-Borrower Additional Information:
-
Descriptions entered on the Continuation Information page.
-
Descriptions entered in the Add Explanation pop-up boxes on the Declarations page (when the Print explanation on URLA check box is selected in the Add Explanation pop-up window).
-
Verifications
A new Verifications page has been added for loans using the URLA 2020 forms. As with the new Application View page, the Verifications page also uses cards (buttons) to provide easy access to ten verification pages.
To Open the Verifications Page:
-
From the Pipeline, select a loan.
-
Select Forms in the left navigation panel, and then select Verifications. The Verifications page opens.

-
The following cards display. For additional information about the pages accessed via the cards, refer to the following sections in these release notes.
- Additional Loans
- Assets (Other)
- Deposit
- Employment
- Gifts & Grants
- Income (Other)
- Liabilities
- Liabilities (Other)
- Mortgage
- Residence
-
To view a verification, select a card, such as Additional Loans.
Verification pages are also accessible by clicking a verification card on the appropriate URLA 2020 data entry page. For example, the Residence verification page can be opened by selecting the Manage VOR button on the Borrower Information page, as shown below.

Each verification page remembers where the user came from. Clicking the browser back button navigates to the page the user last visited.
To Create the First Verification Record
-
When you first access a verification page, if a record has not yet been created for a verification page, a message displays on the page along with a Create a Record button. Select the button to create the first record.

-
A summary of the record is added to the left panel, and the fields for the record display in the right panel.

To Create Additional Verification Records
-
After the first record has been created, select the New icon at the top of the left panel to create a new record.
-
A new entry display in the left navigation panel for each record you add.
-
Select a record in the left panel and then view or edit the verification record in the right panel.
To Delete a Record
-
Select a record in the left panel and then click the Delete icon at the top of the left panel.
To Add a Record to the eFolder
-
Some verification pages allow you to add a verification record to the Documents folder by selecting a Folder icon at the top of the left panel.
ENCW-37932
Use the Additional Loans verification page to record additional new mortgage loans on the subject property aside from existing loans, for example down payment assistance loans or standalone piggyback loans closed with the current loan by either you or another lender. When you enter loans on the Additional Loans verification page, the entries display on the Liabilities Page. If you add additional loan information on the Liabilities page, the information is added to the Additional Loans verification page. All Additional Loan verification records display on the output form, provided the Does Not Apply check box is not selected on the Liabilities page.
To Open the Additional Loans Verification Page
-
In the left navigation panel in a loan file, select Forms > Verifications, and then select the Additional Loans card on the Verifications page.
-
When working on the Liabilities page in a loan file (Forms > Application View > Liabilities), select the Manage VOAL button in the Other New Mortgage Loans on the Property You are Buying or Refinancing section.
To Create a Verification of Additional Loan Record
-
To add a record, select the Create an Additional Loan Record button or select the New icon at the top of the left panel.
-
In the VOAL is for drop-down list, select Borrower, Co-Borrower, or Both.
-
Select the check box to print the statement "See attached borrower's authorization" on the applicant's signature line of the printed form.
-
In the To section, type the name and contact information for the lender providing the additional loan.
-
In the From section, the following options are available for the value that prints in the Title field on the output form.
-
By default, title, phone number, and fax number are populated based on the user selected in the Verification Contact Setup setting in Encompass. Type a different value or clear the field as needed.
-
Select the Print user's name check box to print the name of the user selected in the Verification Contact Setup setting in Encompass. If no selection has been configured in the setting, the name of the logged-in user will print by default.
-
Select the Print user's job title check box to print the job title of the user selected in the Verification Contact Setup setting in Encompass. If no selection has been configured in the setting, the name of the logged-in user will print by default.
-
-
Select an Account Type from the drop-down list, either HELOC or Mortgage.
-
Select a Lien Position for the loan, as many as 10 lien positions are supported.
-
For the Monthly Principal and Interest and Maximum Principal And Interest Within 5 Years, type a value or select the Edit icon to calculate a value.
-
Enter the Loan Amount or the HELOC Credit Limit (for a HELOC loan).
-
Enter any HELOC draw to be disbursed, if applicable.
-
Enter the amount of the additional loan that will be applied to the down payment for the current loan. This amount is included in the Subordinate Financing amount (field ID 140) and will feed the cash to close.
-
Select any of check boxes that apply.
-
Select the New icon to add another mortgage record.
Creating a linked piggyback loan in Encompass will create a new VOAL entry for the loan.
Use the Other Assets verification page to record other assets for the borrower pair that are outside the traditional account deposit structure, allowing the lender to identify the cash or market value of assets or asset accounts other than bank and retirement accounts. When you enter other assets on the Other Assets verification page, the entries also display in the Other Assets section of the Assets, Gifts & Grants page. If you add other asset information on the Assets, Gifts & Grants page, the information is also added to the Other Assets verification page. All Other Assets verification records display on the output form, provided the Does Not Apply check box is not selected o the Assets, Gifts & Grants page.
To Open the Other Assets Verification Page
-
In the left navigation panel in a loan file, select Forms > Verifications, and then select the Assets (Other) card on the Verifications page.
-
When working on the Assets, Gifts & Grants page in a loan file (Forms > Application View > Assets, Gifts & Grants), select the Manage Other Assets button in the Other Assets section.
To Create an Assets (Other) Verification Record
-
To add a record, select the Create an Other Asset Record button or select the New icon at the top of the left panel.
-
Select an option from the Other Asset is for list to indicate for whom the asset record is being created: Borrower, Co-Borrower, or Both.
-
Select the check box to print the statement "See attached borrower's authorization" on the applicant's signature line on the output form.
-
Complete the To: (Name & Address of Depository) section.
-
Select the Address Book icon to add a depository from the Verification category of your business contacts. You can also type a name and then right-select to create a new contact in your business contacts.
-
-
In the From section, select the Print user's name check box to print the name of the user selected in the Verification Contact Setup setting in Encompass. If no selection has been configured in the setting, the name of the logged-in user will print by default.
-
Select the Print user's job title check box to print the job title of the user selected in the Verification Contact Setup setting in Encompass. If no selection has been configured in the setting, the name of the logged-in user will print by default.
-
In the Account Information section, select a Description from the list.
-
If you select Other as the Description, enter a description in the Other Description field. This option is primarily used to convert FNMA 3.2 other asset options to the new Verification of Other Assets structure.
-
Enter the Cash or Market Value.
-
Select the New icon to add additional entries as needed.
Use the Deposit verification page to record deposit and associated account information. When you create entries on the Deposits verification page, the entries also display in the Assets - Bank Accounts, Retirement and Other Accounts section of the Assets, Gifts & Grants page. When you add entries to the Assets - Bank Accounts, Retirement and Other Accounts section of the Assets, Gifts & Grants page, the entries are also added to the Deposits verification page.
With URLA 2020 forms, non-depository account information is now recorded on the Other Assets verification page.
To Open the Deposit Verification Page
-
In the left navigation panel in a loan file, select Forms > Verifications, and then select the Deposit card on the Verifications page.
-
When working on the Assets, Gifts & Grants page in a loan file (Forms > Application View > Assets, Gifts & Grants), select the Manage VOD button in the Assets - Bank Accounts, Retirement and Other Accounts section.
To Create a Deposit Record
-
To add a record, select the Create an Additional Loan Record button or select the New icon at the top of the left panel.
-
Select an option from the VOD is for list to indicate for whom the deposit information is being created: Borrower, Co-Borrower, or Both.
-
Complete a separate verification entry for the depository if more than one option applies.
-
-
Select the check box to print the statement "See attached borrower's authorization" on the applicant's signature line on the printed form.
-
Complete the account holder information in the To: (Name & Address of Depository) section.
-
Select the Address Book icon to add a depository from the Verification category of your business contacts. You can also type a name and then right-select to create a new contact in your business contacts.
-
-
In the From section, the following options are available for the value that prints in the Title field on the output form.
-
Accept the default value.
-
Type a different value or clear the field.
-
Select the Print user's name check box to print the name of the user selected in the Verification Contact Setup setting in Encompass. If no selection has been configured in the setting, the name of the logged-in user is printed by default.
-
Select the Print user's job title check box to print the job title of the user selected in the Verification Contact Setup setting in Encompass. If no selection has been configured in the setting, the name of the logged-in user will print by default.
-
-
Select an Account Type, and then type account information for each account held at the depository.
-
Select the New icon to create another record.
Use the Employment verification page to record current and previous employers. When you add employment information on the VOE, the employment records display on the Employment and Income page according to the following logic:
-
The Current Employment/ Self Employment and Income section displays the first record from the Employment verification entry marked as Current for the borrower or co-borrower. If there is no current employment verification entry for the borrower or co-borrower, the Current Employment/ Self Employment and Income section is blank.
-
The Additional/Self Employment and Income section displays the second employment verification entry marked as Current for the borrower or co-borrower. When there is no second current employment verification entry for the borrower or co-borrower, this section is blank.
-
The Previous Employment and Income section displays the first employment verification entry marked as Prior for the borrower or co-borrower. When there is no prior employment verification entry for the borrower or co-borrower, this section is blank.
If you add employment information to the Employment & Income page, an entry is also created on the Employment verification page. All employment verification records display on the URLA 2020 output forms, provided the Does Not Apply check boxes are not selected in the sections for current, additional, or previous employment records on the Employment & Income page.
To Open the Employment Verification Page
-
In the left navigation panel in a loan file, select Forms > Verifications, and then select the Employment & Income card on the Verifications page.
-
When working on the Employment & Income page in a loan file (Forms > Application View > Employment & Income), then select the Manage VOE button in one of the first three sections on the page.
To Create a New Employment Record
-
To add a record, select the Create an Employment Record button or select the New icon at the top of the left panel.
-
On the New Employment dialog box, select a Borrower Type and Employment Status, and then select OK.
-
Select the check box to print the statement "See attached borrower's authorization" on the applicant's signature line on the printed form.
-
Enter the borrower's badge number or employee ID. The ID entered in this field is printed below the name and address of the applicant in section 7 of the Request for Verification of Employment output form.
-
Complete the employer information in the To: (Name & Address of Employer) section.
-
Select the Address Book icon to add an employer from the Verification category of your business contacts. You can also type a name and then right-select to create a new contact in your business contacts.
-
-
In the From section, the following options are available for the value that prints in the Title field on the output form.
-
Accept the default value of Loan Processor.
-
Type a different value or clear the field.
-
Select the Print user's name check box to print the name of the user selected in the Verification Contact Setup setting in Encompass. If no selection has been configured in the setting, the name of the logged-in user is printed by default.
-
Select the Print user's job title check box to print the job title of the user selected in the Verification Contact Setup setting in Encompass. If no selection has been configured in the setting, the name of the logged-in user will print by default.
-
-
Complete the Employer Information section.
-
Add the employment details in the Employment and Gross Monthly Income sections.
-
Select the check box to indicate when the borrower is employed by a party to the transaction.
-
Select the check box if the borrower is a business owner or self-employed, and then select any additional self-employment check boxes that apply.
-
Enter the monthly income or loss and percentage of the business owned.
Use the Gifts & Grants verification page to capture gifts or grants the borrower, co-borrower, or both are using for the loan. When you add entries on the Gifts & Grants verification page, the entries also display in the Gifts or Grants You Have Been Given or Will Receive for this Loan section on the Assets, Gifts & Grants page. Entries created in the Gifts or Grants You Have Been Given or Will Receive for this Loan section on the Assets, Gifts & Grants page also display on the Gifts & Grants verification page. All Gifts & Grants verification entries display on the printed output form, provided the Does Not Apply check box is not selected for the borrower or co-borrower in the Gifts or Grants You Have Been Given or Will Receive for this Loan section on the Assets, Gifts & Grants page.
To Open the Gifts & Grants Verification Page
-
In the left navigation panel in a loan file, select Forms > Verifications, and then select the Gifts & Grants card on the Verifications page.
-
When working on the Assets, Gifts & Grants page in a loan file (Forms > Application View > Assets, Gifts & Grants), select the Manage Gifts & Grants button in the Gifts or Grants You Have Been Given or Will Receive for this Loan section.
To Create Verification of Gifts and Grants Records
-
To add a record, select the Create a Gifts & Grants Record button or select the New icon at the top of the left panel.
-
Select an option from the Verification of Gifts and Grants is for list to indicate for whom the asset record is being created: Borrower, Co-Borrower, or Both.
-
Select the check box to print the statement "See attached borrower's authorization" on the applicant's signature line on the output form.
-
Complete the To: (Name & Address of Depository) section.
-
Select the Address Book icon to add a depository from the Verification category of your business contacts. You can also type a name and then right-select to create a new contact in your business contacts.
-
-
In the From section, select the Print user's name check box to print the name of the user selected in the Verification Contact Setup setting in Encompass. If no selection has been configured in the setting, the name of the logged-in user will print by default.
-
Select the Print user's job title check box to print the job title of the user selected in the Verification Contact Setup setting in Encompass. If no selection has been configured in the setting, the name of the logged-in user will print by default.
-
In the Gifts and Grants Information section, select an Asset Type from the list.
-
Select a Source from the list.
-
If you select Other as the Source, enter a description in the Other Source Description field.
-
Select the Deposited check box if the gift or grant is deposited.
-
Enter the Amount.
Use the Other Income verification page to capture other income sources for the borrower pair, which includes everything not related to employment or rental income, for example dividends and interest, capital gains, disability, royalties, trusts, social security, and retirement accounts. When you add entries on the Other Income verification page, the entries also display in the Income from Other Sources section on the Employment & Income page. Entries created in the Income from Other Sources section on the Employment & Income page also display on the Other Income verification page. All Other Income verification entries display on the printed output form, provided the Does Not Apply check box is not selected for the borrower or co-borrower in the Income from Other Sources section on the Employment & Income page.
To Open the Other Income Verification Page
-
In the left navigation panel in a loan file, select Forms > Verifications, and then select the Income (Other) card on the Verifications page.
-
When working on the Employment & Income page in a loan file (Forms > Application View > Employment & Income), select the Manage Other Income button in the Income from Other Sources section.
To Create a Verification of Other Income Record
-
To add a record, select the Create an Income (Other) Record button or select the New icon at the top of the left panel.
-
Select an option from the Other Income is for list to indicate for whom the deposit information is being created: Borrower or Co-Borrower.
-
Select the check box to print the statement “See attached borrower’s authorization” on the applicant’s signature line on the output form.
-
Complete the account holder information in the To: (Name & Address of Depository) section.
-
Select the Address Book icon to add a depository from the Verification category of your business contacts. You can also type a name and then right-select to create a new contact in your business contacts.
-
In the From section, select the Print user’s name check box to print the name of the user selected in the Verification Contact Setup setting in Encompass. If no selection has been configured in the setting, the name of the logged-in user will print by default.
-
Select the Print user’s job title check box to print the job title of the user selected in the Verification Contact Setup setting in Encompass. If no selection has been configured in the setting, the name of the logged-in user will print by default
-
In the Other Income Information section, select an Income Source from the list. If you select Other as the Income Source, type a description in the Other Description field. This option is primarily used to convert FNMA 3.2 other income options to the new URLA 2020 structure.
-
Enter the Monthly Income amount.
Use the Liabilities verification page to capture liabilities and associated payment information. The Liabilities verification page maps all the liabilities from the credit report except for mortgages and HELOCs. When you add entries on the Liabilities verification page, the entries also display in the Credit Cards, Other Debts and Leases section on the Liabilities page. Entries created in the Credit Cards, Other Debts and Leases section on the Liabilities page also display on the Liabilities verification page. All liability verification records display on the output form, provided the Does Not Apply check box is not selected for the borrower or co-borrower in the Credit Cards, Other Debts and Leases section on the Liabilities page.
To Open the Liabilities Verification Page
-
In the left navigation panel in a loan file, select Forms > Verifications, and then select the Liabilities card on the Verifications page.
-
When working on the Liabilities page in a loan file (Forms > Application View > Liabilities), select the Manage VOL button in one of the first two sections.
To Create a Liability Record
-
To add a record, select the Create a Liability Record button or select the New icon at the top of the left panel.
-
Select an option from the drop-down list to indicate with whom the liability information is associated: Borrower, Co-Borrower, or Both.
-
Select the check box to print the statement "See attached borrower's authorization" on the applicant's signature line on the printed form.
-
Complete the creditor information in the To: (Name & Address of Creditor) section.
-
Select the Address Book icon to add a creditor from the Verification category of your business contacts. You can also type a name and then right-select to create a new contact in your business contacts.
-
-
In the From section, the following options are available for the value that prints in the Title field on the output form.
-
Accept the default value of Loan Processor.
-
Type a different value or clear the field.
-
Select the Print user's name check box to print the name of the user selected in the Verification Contact Setup setting in Encompass. If no selection has been configured in the setting, the name of the logged-in user is printed by default.
- Select the Print user's job title check box to print the job title of the user selected in the Verification Contact Setup setting in Encompass. If no selection has been configured in the setting, the name of the logged-in user will print by default.
-
-
Add the liability information in the Account Information and Debt Information sections.
-
Select in the Account Type field and type the liability category.
-
In the Debt Information section, select the This Debt is NOT secured to Subject Property? check box if the liability is not secured to the property (i.e., the subject property cannot be recovered by the creditor in case of default). Examples include credit card purchases, student loans, and other unsecured debt.
-
To enable this check box, a liability must be entered and the Will be paid off check box must be selected.
-
Select the Payment includes Taxes and Insurance check box for mortgage liabilities that are linked to an REO asset to document whether the payment coming from the credit report includes taxes and insurance. This field, along with the Mortgage Type drop-down list, is required for AUS submission of real estate assets (mortgage verification records) with linked liabilities.
-
-
Add the payment delinquency (i.e., "lates") information in the Payment History section.
Use the Other Liabilities verification page to capture liabilities for the borrower pair from either the credit report or borrower disclosures that are not related to the items covered in the Credit Cards, Other Debts and Leases section on the Liabilities page or the Financial Information – Real Estate page. Examples include alimony, child support, separate maintenance, and job-related expenses.
When you add entries on the Other Liabilities verification page, the entries also display in the Other Liabilities and Expenses section on the Liabilities page. Entries created in the Other Liabilities and Expenses section on the Liabilities page also display on the Liabilities verification page. All Other Liabilities verification records display on the output form, provided the Does Not Apply check box is not selected for the borrower or co-borrower in the Credit Cards, Other Debts and Leases section on the Liabilities page.
To Open the Other Liabilities Verification Page
-
In the left navigation panel in a loan file, select Forms > Verifications, and then select the Liabilities (Others) card on the Verifications page.
-
When working on the Employment & Income page in a loan file (Forms > Application View > Liabilities), select the Manage VOOL button in the Other Liabilities and Expenses section.
To Create an Other Liabilities Verification Record
-
To add a record, select the Create a Liability (Other) Record button or select the New icon at the top of the left panel.
-
Select an option from the Verification of Other Liability is for list to indicate for whom the liability record is being created: Borrower, Co-Borrower, or Both.
-
Select the check box to print the statement "See attached borrower's authorization" on the applicant's signature line on the output form.
-
Complete the To: (Name & Address of Depository) section.
-
Select the Address Book icon to add a depository from the Verification category of your business contacts. You can also type a name and then right-select to create a new contact in your business contacts.
-
In the From section, select the Print user's name check box to print the name of the user selected in the Verification Contact Setup setting in Encompass. If no selection has been configured in the setting, the name of the logged-in user will print by default.
-
Select the Print user's job title check box to print the job title of the user selected in the Verification Contact Setup setting in Encompass. If no selection has been configured in the setting, the name of the logged-in user will print by default.
-
In the Account Information section, select a Description from the list.
-
If needed, complete the Other Description.
-
Enter the monthly Amount, Balance, Months Left, and Credit Limit fields as needed.
Use the Mortgage verification page to capture mortgage information for properties owned by the borrowers. The information on the Mortgage verification page is linked to the information for the properties that display on the Financial Information - Real Estate page. Data entered or updated on one page is copied to the other, and the order in which the properties are listed is the same on both pages. When the Subject Property check box is selected for a property, the subject property moves to the top of the list on the Mortgage verification page and the Financial Information – Real Estate page. Changing the order of the properties on one page also changes the order of the properties on the other page. All Mortgage verification entries display on the printed output form, provided the Does Not Apply check boxes are not selected on the Financial Information - Real Estate page.
To Open the Mortgage Verification Page
-
In the left navigation panel in a loan file, select Forms > Verifications, and then select the Mortgage card on the Verifications page.
-
When working on the Financial Information - Real Estate page in a loan file (Forms > Application View > Financial Information - Real Estate), select the Manage VOM button in the Mortgage Loans on this Property section.
To Create a New Mortgage Record
-
To add a record, select the Create a Mortgage Record button or select the New icon at the top of the left panel.
-
In the VOM is for drop-down list, select Borrower, Co-Borrower, or Both. This field will be populated by default when linking a liability.
- Select the check box to print the statement "See attached borrower's authorization" on the applicant's signature line of the printed form.
- In the From section, the following options are available for the value that prints in the Title field on the output form.
-
Accept the default value of Loan Processor.
-
Type a different value or clear the field.
-
Select the Print user's name check box to print the name of the user selected in the Verification Contact Setup setting in Encompass. If no selection has been configured in the setting, the name of the logged-in user is printed by default.
-
Select the Print user's job title check box to print the job title of the user selected in the Verification Contact Setup setting in Encompass. If no selection has been configured in the setting, the name of the logged-in user will print by default.
-
Add the applicable information for the property associated with the mortgage.
-
In the Linked Liabilities / Attached Liens section, select the Manage Liabilities button, select the liabilities associated with the new mortgage record, and then select OK.
- Enter additional comments or notes, if needed.
Use the Residence verification page to capture current and previous residences for the borrower pair. The information entered here is linked to the Current Address and Former Address sections on the Borrower Information page. Data entered or updated on one page is copied to the other:
-
The first Current address listed on the Residence verification page displays on the Current Address section of the Borrower Information page.
-
The first Prior address listed in the Residence verification page displays on the Former Address section of the Borrower Information page.
These sections iterate on the printed output form. All Residence verification records entered for either Current or Former addresses will print to the output form, provided the Does Not Apply check box is not selected for the Former Address section on the 1003 URLA Part 1.
To Open the Residence Verification Page
-
In the left navigation panel in a loan file, select Forms > Verifications, and then select the Residence card on the Verifications page.
-
When working on the Borrower Information page in a loan file (Forms > Application View > Borrower Information), select the Manage VOR button in the Current/ Former/ Mailing Address section.
To Create a New Residence Record
-
To add a record, select the Create a Mortgage Record button or select the New icon at the top of the left panel.
-
On the New Residence window, select a Borrower Type and Residence Type, and then select OK.
-
Select the check box to print the statement "See attached borrower's authorization" on the applicant's signature line of the printed form.
-
Complete the To: (Name & Address of Landlord) section if the residence is, or was, rented.
- Select the Address Book icon to add a landlord from the Verification category of your business contacts. You can also type a name and then right-select to create a new contact in your business contacts.
- In the From section, the following options are available for the value that prints in the Title field on the output form.
-
Accept the default value of Loan Processor.
-
Type a different value or clear the field.
-
Select the Print user's name check box to print the name of the user selected in the Verification Contact Setup setting in Encompass. If no selection has been configured in the setting, the name of the logged-in user is printed by default
-
Select the Print user's job title check box to print the job title of the user selected in the Verification Contact Setup setting in Encompass. If no selection has been configured in the setting, the name of the logged-in user is printed by default.
-
Complete the Residence Information section and then type the account name for the residence.