Encompass LO Connect Updates and Enhancements to Features - 21.2 Major Release
This section discusses the updates and enhancements to existing forms, features, services, or settings that are provided in this release.
Mobile URLA Form Updates
In order to further support the new URLA forms on the mobile Application View pages, the following calculation pop-up windows have been added:
-
Military Entitlements
-
Other Financial Payment
-
Mortgage Payment Calculator
-
Bankruptcy, Foreclosure and Mortgage Delinquency
-
ARM types
-
Adjustable Rates
-
Supplemental Property Insurance
-
Acknowledgements and Agreements
ENCW-53156
New Forms
Support for the HELOC Management form has been added to Encompass LO Connect. The HELOC Management input form functions as a consolidated centralized workspace for HELOC loans. Most of the fields on the HELOC Management input form can be populated by applying loan program templates, by using business rules or Dynamic Data Management triggers, or by a combination of these methods. Users can manually enter data on this form to adjust the terms for the HELOC, for example by capturing an index and margin, capturing adjustment caps if needed, defining an introductory teaser rate for a specified number of months, setting a minimum initial advance, or selecting a different predefined historical table.
The HELOC Management input form consists of a HELOC Program page and an Important Terms and Agreement Language page. The HELOC Program page is used to set the parameters and enter data for the HELOC loan and the Important Terms and Agreement Language page contains options used to populate data and language specific to the HELOC loan configuration on the dynamically generated HELOC Agreement and the Important Terms Disclosure output forms in Encompass.
To Access the HELOC Management Form:
- From a loan in Encompass LO Connect, select HELOC Management from the forms list.
-
To view the HELOC Program page, select HELOC Program.
- To view the Important Terms and Agreement Language page, select Important Terms and Agreement Language.
- To change between pages, either select the HELOC Management link or select the Arrow
 and then select the page you want to view.
ENCW-46848
A new Disclosure Summary form has been added to Encompass LO Connect. This form is exclusive to Encompass LO Connect and enabled LO Connect users to view important disclosure dates on one form. To access the Disclosure Summary form, select Disclosure Summary from the Forms list on a loan in Encompass LO Connect.
Note: In order for users to access this form, an administrator in Encompass must give access to the form on the users persona by going to Encompass > Settings > Company/User Setup > Persona and enabling the form on the LO Connect tab on the user's persona.
ENCW-46851
Support for the USDA Management forms has been added to Encompass LO Connect. The USDA Management input form provides a convenient, centralized location for entering data for and tracking the progress of USDA Rural Housing loans. The USDA Management form includes seven forms:
-
URLA Addendum - This form contains the fields from Page 6 of the Rural Assistance URLA form in Encompass.
-
Income Worksheet - This form contains fields for Annual Income Calculation, Adjusted Income Calculation, and Monthly Repayment Income Calculation.
-
Request for SFH Loan - Contains fields for a Request for Single Family Housing Loan Guarantee
-
Loan Closing Report - Contains fields used for the Loan Closing Report.
-
Tracking - Contains information used to track the progress of a USDA loan.
-
ULDD - Fannie Mae - Provides access to the Fannie Mae ULDD form.
-
ULDD - Freddie Mac - Provides access to the Freddie Mac ULDD form.
To Use the USDA Management Form View:
-
From a loan in Encompass LO Connect, select USDA Management from the forms list.
-
The USDA Management form displays. To view a form, select a card, such as URLA Addendum.
-
To switch to a different form, select the Blue Arrow
 next to the form name and then select the form you want to view.
Note: The Number of dependents under age 18 or Full-time Students field (Encompass field USDA.X185) is not currently calculating the correct number of dependents. As a work around, you can select the lock icon in front of the field and manually enter the correct value. This issue will be resolved in a future release.
ENCW-52063
Enhanced Conditions
Support has been added for Encompass users, who have Investor Connect enabled, to both import conditions from Investor Connect and to deliver updated conditions back to the investor. This change enabled lenders to more easily receive and resolve delivery conditions that must be met before a loan meets the requirements set by an Encompass Investor Connect partner. Partners who have integrated into Encompass Investor Connect can configure the workflow to electronically send delivery conditions for a loan back to the lender. For example, investors can send purchase conditions that must be resolved before the lender can sell the loan, and warehouse lenders can send funding conditions that must be addressed before the warehouse lender provides funding for the loan.
Lenders can then import the conditions into Encompass LO Connect, track and resolve the conditions, and electronically send condition responses back to the partner. Lenders can also receive updates against existing conditions from Encompass Investor Connect Partners, maintaining the connection for all updates that are made for an existing condition.
Note: In order to use this feature, your administrator must configure Encompass to use both Enhanced Conditions and Investor Connect and the investor partner must have enabled the workflow for electronically sending conditions between lenders and partners via Encompass Investor Connect. For more information on configuring Encompass to utilize Investor Connect, see the Encompass Investor Connect Lender User's Guide.
To Import Investor Connect Conditions to a Loan:
-
From a loan in Encompass LO Connect, select Conditions from the left navigation menu.
-
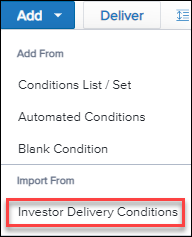
Select Add, and then select Investor Delivery Conditions from the Import From section.
-
Select the check-box in front of any conditions that you want to import, and then select Import. The Tracking column indicates the current status of the conditions as either New, Updated, Or Imported.
-
To view details about an individual condition, select the Blue Arrow icon to expand the condition details
-
Imported conditions can be easily identified in the Conditions Pipeline by viewing the Source of Conditions column, as these conditions are labeled with Investor Delivery.
Delivering Conditions
In order to deliver a condition back to the partner, the status for the condition must be updated and a comment or document must be assigned to the condition. To update the status, select the current status in the Latest Status Update column.
Note: Only statuses that have been configured by the admin in the Encompass Settings > External Company Setup > Investor Connect Settings > Conditions Delivery section are eligible for delivery.
-
When you are ready to deliver conditions to the Lender, select Deliver.
-
On the Deliver Condition Responses page, a list of eligible conditions displays. To deliver the conditions, select Deliver. The Delivery in progress message displays.
-
To view a history of conditions delivered for the loan, select Delivery History. The Delivery History page updates once the delivery is completed.
ENCW-56512
Task Based Workflow Updates
Several new columns have been added to the Workflow Tasks tool within the loan to assist users in sorting and filtering their list of tasks in Encompass LO Connect. The addition of these columns also enables users to view more tasks information from the Workflow Tasks tool without having to open the task. The following new columns are available:
-
Disposition
-
Created Date
-
Due Date
-
Assigned To
In addition to this, the Workflow Tasks tool now has a default sorting based on the Priority column in ascending order. Additionally, the tool is further sorted by the created date within that priority designation. These enhancements align with how the tasks are featured in the Workflow Tasks pipeline and provide a seamless experience to the user as they transition from the tasks pipeline to the tool within the loan.
ENCW-56844, ENCW-57291, ENCW-57290, ENCW-56567, ENCW-56927
Users are now able to update a tasks priority from the Tasks Pipeline in the Workflow Tasks section of Encompass LO Connect. Once and administrator has applied the new persona setting to a user (See Updates to LO Connect Personas Settings In the Encompass Release Notes), the user is now able to select the Edit  icon next to the priority option for a task and edit the priority level.
To Update a Tasks Priority
-
From Encompass LO Connect, select Workflow Tasks.
-
Hover over the priority number for a task in the Tasks Pipeline, and then select Edit
. -
Select the appropriate priority level from the list to change the priority of the task.
ENCW-58285
To assist users in locating the correct form or document in the task workspace search window, the icons for Forms and Documents have been updated. This change enables users to differentiate between a form and a document at a glance. The updated icons are listed below:
-
Form:

-
Document:

![]()
ENCW-56835
A change has been made to tasks using a two-pane view to enable the user to utilize more space when a document is opened in a separate window using the Pop-Out  button. When a user selects the Pop-Out button on a document, and the document is opened in a new window, the two-pane view is now converted to a single pane. The remaining item in the workspace fills the space where the other document was.
ENCW-54054
Administrators can now move a task from one parent task group to another task group or from a standalone task to a task group. Previously, administrators could only re-arrange tasks within the same task group. This update provides administrators the flexibility to change the organization of the task templates without having to re-create them. To facilitate this change, a new Edit icon has been added to the Parent Task Group section when editing the task.
To Move a Task to a Different Parent Task Group
-
From the Encompass Admin Portal, select Workflow Tasks.
-
Select Tasks.
-
Select the task you want to move from the tasks lists, and then select Edit
. -
Navigate to the Parent Task Group field, and then select Edit
. -
On the Select Parent Task Group window, select the parent task group that you want to move the task to and then select Apply.
-
Select Save.

ENCW-59697
A change has been made where the Auto Complete when child tasks are completed option is not selected by default when creating new tasks groups. This change was made to keep this option consistent with the task creation default option.

ENCW-56428
Workflow Rules Updates
Two new triggering events have been added for Workflow Rules in Encompass LO Connect. These additional triggering events enable administrators to create automated workflow rules for a larger set of situations. The following triggering events have been added:
-
Document Added - Triggers when a specified document folder is added to a loan.
Note: This event is triggered only when the triggering action occurs in Encompass LO Connect of via API triggers. It does not trigger when the triggering action occurs in Encompass. This event is a good method for tracking when a service order is completed after the user orders it through Encompass LO Connect. For example: You may create a rule to trigger based on the "Credit Report" document in order to identify that the credit order was completed after the user orders credit in Encompass LO Connect.
-
Field Value Modified - Triggers when a specified field is modified and the loan is subsequently saved. The field assigned to this trigger event must be part of the Reporting Database and must also be included in the Encompass Audit Trail tool.
Note: You should consider the performance implications on Encompass when adding fields to the Reporting Database and the Audit Trail. It is not recommeded to add several new fields to the Reporting Database and the Audit Trail to take advantage of this new event. To the extent that you already have key fields in the Reporting DB and included in the Audit Trail, consider using those fields with this new event.
ENCW-51375
Services Changes
Several credit vendors now support Automated Ordering in Encompass LO Connect. With this change, administrators can define conditions which trigger an automated credit order attempt for loans that meet the defined criteria.
For more information on configuring an automated service order setup, click here.
EVP-20293
Starting with this release, the following updates have been made to the MI Company drop-down values:
- GE updated to Genworth
- UG updated to ARCH MI

EVP-21645
A new filtering option has been added to the Authorized Users section on the Edit Order Options page for a service on the Services Management page. The new Persona filtering option enables an administrator to view a list of only those users with a specific persona and then add users from that persona as authorized users for a service order setup. This behavior is similar to how you ad users from the Services Password Management section in Encompass.

To View a Filtered List of Users by Persona:
-
From the Edit Order Options page for a new or existing service setup, navigate to the Authorized Users section at the bottom of the page.
-
Select the Down Arrow
 icon next to Personas to view the list of personas.
 -
Select the Down Arrow
icon next to a specific persona to view the list of users associated with that persona. -
Select the Move Arrow
 icon next to the users you want to add to the list of authorized users.
ASO-8154
A new Readiness Conditions field has been added to all manual service order setups, enabling administrators to define conditions that must be met before the user is able place an order for a specific service setup. This ensures that the user is not able to place service orders until the conditions are met, for example preventing the credit order form being placed until the credit authorization fields are populated. The new Readiness Conditions field is located on the Edit Order Options page for new and existing manual service setups. Similar to the One-Click Readiness Conditions field, the conditions syntax utilizes the Visual Basic .NET programming language. For information on how this syntax works, see the Advanced Coding for Business Rules guide. After entering any readiness conditions, the administrator can also select the new Validate button to validate the readiness conditions.

ASO-8272
A change has been made to automatically authorize users with the Administrator and Super Administrator personas for any active service order setup on the Services Management page. Previously, these users needed to be added manually to each service setup.
ASO-8105
New partners and ordering options are available in Encompass LO Connect. The changes are detailed below:
-
Additional Appraisal partners added.
-
Support for automated service ordering for additional Flood Determination Service providers.
-
Support for Verification of Income (VOI) and Verification of Employment (VOE) services.
For information on configuring a new Service Order Setup to utilizes these new providers, review the Service Management help topic.
EVP-20682
A change has been made to the Services option in the left navigation menu on loans in Encompass LO Connect. Previously, when a user selected Services the Services landing page displayed. Now, when the user selects Services there is now an All Services option. Selecting All Services takes the user to the Services landing page. This change is to accommodate additional features in the services category.
ASO-8265
Updates and Enhancements to Features
In order to provide clarity to users, the name of the user or user group assigned to a milestone is now displayed when a user views the details for a milestone on the Milestone Worksheet. Previously, the assigned user or user groups were not displayed when they had previously been assigned to the milestone.
(Added on 6/4/2021)
For loans using the new URLA forms, the following line item description fields on the Proposed Supplemental Property Insurance pop-up window are now prepopulated and disabled for manual entry when the fees are mapped and applied in the Itemization Fee Management settings in Encompass (Encompass > Settings > Tables and Fees > Itemization Fee Management).
-
1007 (field ID 1628)
-
1008 (field ID 660)
-
1009 (field ID 661)
The Proposed Supplemental Property Insurance pop-up window displays when you click the Edit icon for Supplemental Insurance on the 1003 ULRA – Lender input form.
Note that in order for the Itemization Fee Management settings to be enforced as described and to avoid receiving errors when accessing the Proposed Supplemental Property Insurance pop-up window in Encompass LO Connect, the Apply to Itemization check box located near the top of this settings screen must be selected, the user's assigned persona settings must indicate that they can access the Fee Description fields (Personas > Loan tab > Fee Description check box in the Itemization Fee Management section), and, on the Itemization Fee Management setting, the user's assigned persona must be enabled to manually overwrite existing fee descriptions in these fields (Itemization Fee Management > Persona Overwrite tab > select the user's persona, and then select the Section 1000 - Reserves Deposited with Lender check box.)
EBSP-27996
A new enhancement has been added that enables users to create an opportunity record using lead data. Users can now leverage the Scenario Comparison Tool to create loan scenarios with real time pricing and issue an eligibility letter for eligible scenarios. Users can also create a lead in the Prospects section from an opportunity record in the Scenario Comparison Tool.
Note: This feature is available to Encompass LO Connect instances that have the Prospect Engagement feature enabled.
To Create a Lead From an Opportunity
-
From the Opportunity Dashboard for an opportunity in the Scenario Comparisons tool, select the Menu
 .
. -
Select Create Lead.

-
On the Create Lead confirmation pop-up, select OK.

The lead is created and the users is navigated to the lead details within the Prospects tab. This lead is also located in the Prospects Normal View.
To Create an Opportunity From a Lead
-
Open a lead in the Prospects tab that you want to run opportunity pricing scenarios for.
-
Select the Menu
, and then select Create Opportunity.
-
On the Create Opportunity confirmation pop-up, select OK.

The user is taken to the Opportunity dashboard of the newly created opportunity record.
The Mobile Phone and Email Address fields on the Opportunities Dashboard for an opportunity can now be tapped when using Encompass LO Connect in the mobile view. This change enables the user to initiate an email or phone call from the opportunity directly.

Prospect Engagement
Starting with this release, all records associated with a lead (opportunities, incomplete applications in Consumer Connect, and loans) are displayed as links on the Lead Details page.

To support this enhancement, the Lead Details page now includes a Related Links panel (in the More Options drop-down) displaying the following links to consolidate all Lead-related information in one place:
- Opportunity: Click this link to view the opportunity record related to the lead to run pricing and create loan scenarios.
- Incomplete Application: Click this link to view the progress of an abandoned application in Encompass Consumer Connect (ECC). The Incomplete Application link also displays when an invite to apply in ECC has been sent to the lead. When the application is submitted by the user in ECC, the Incomplete Application link dynamically updates to a Loan link.
- Loan: Click this link to open the loan directly from the Prospects tab/Lead Details page.
ENCW-58048
Fixed Issues
Why we made these updates: The following issues were fixed to improve usability and to help ensure Encompass LO Connect is operating as expected. The issues that are chosen to be fixed are based on the severity of their impact to clients and client feedback.
An issue was discovered where the FHA Secondary Residence field on the Loan Information page could only be selected if the Property Will Be field was set to Secondary. This has been fixed, and now the FHA Secondary Residence field can be set independently of the selection made for the Property Will Be field.
An issue was discovered where all Factual Data credit ordering options were being executed as a Tri-Merge credit report. In order to accommodate additional order types, a new Factual Data by CBC provider listing has been added to Encompass LO Connect. This new integration enables users to select the credit bureaus to order the report from, providing more flexibility to the user.
An issue was discovered where the Show priority and Show due date/time options were not being enforced when enabled in the Global Task Settings. This has been fixed, and now these settings are enforced.

(Added on 5/26/2021)
The following updates have been made to the Correspondent Purchase Advice form in Encompass LO Connect:
-
Payment Amortization Values Now Displaying as Expected - An issue occurred in Encompass LO Connect with the Correspondent Purchase Advice input form. Although data was populated into the Payment Amortization Table section (Payment History tab) of the Correspondent Purchase Advice Form in Encompass, this payment amortization table data was not displaying for the loan in Encompass LO Connect when users opened this form. This issue has been resolved so that the Payment Amortization Table data is displayed as expected in Encompass LO Connect.
To view this data in Encompass LO Connect, open the loan file, and then go to Tools > Correspondent Purchase Advice Form > Payment History > Payment Amortization Table.
-
Fields Now Aligned Correctly – Two fields, SRP Percentage and Final Buy Price, were misaligned on the Correspondent Purchase Advice form. The fields and the field labels are now displayed correctly on the form and properly aligned.
(Added on 5/26/2021)
When working in loans in Encompass LO Connect, the Monthly Income and Combined Housing section of the loan application input form was displaying certain co-borrower data incorrectly. In the Co-Borrower section of the form, NaN (which stands for Not a Number) was displayed in certain fields when no corresponding dollar value was entered for the item in the loan. Since no dollar amount was indicated for the fields for the co-borrower, these fields should have been displaying as empty fields. This issue has been resolved and these fields now display as empty fields as expected for the co-borrower and no longer display NaN.

This was purely a cosmetic issue for the input form. The calculations and functionality related to these fields were not impacted by this issue.
NGENY-26995
(Added on 5/26/2021)
If a “Remove” button has been provided on an input form in Encompass LO Connect to enable users to remove data from the form, an issue occurred in the pop-up confirmation message that displays when users click the button. Portions of the message were not displayed correctly, making the message difficult to read. This issue has been resolved so that the wording wraps correctly and the message is now displayed clearly.

| Next Section: Web Input Form Builder Updates | ||
| Previous Section: Introduction |